Kodeclik Blog
How to build a Dynamic Div Mover
Ever wanted to create an interactive web element that moves content between containers? In this tutorial, we'll build a dynamic div mover that demonstrates DOM manipulation and parent-child relationships in HTML/CSS/Javascript.
Understanding the Core Concept
The foundation of our div mover lies in understanding how to change the parent of an element in Javascript.
When you want to move a div from one container to another, you're essentially changing its parent-child relationship in the DOM tree. The beautiful thing about Javascript's DOM manipulation is that this process is surprisingly straightforward.
The key insight is that when you append an existing element to a new parent, the browser automatically handles the removal from the old parent. You don't need to explicitly remove the element first - the appendChild() method takes care of both operations in one step. Let's see this in action with a simple example.
Imagine you have this HTML structure:
<div id="container-a">
  <div id="movable-box">
    I can be moved!
  </div>
</div>

<div id="container-b">
  I'm waiting for content...
</div>
To move the movable-box from container-a to container-b, you would use this Javascript:
const boxToMove = document.getElementById('movable-box');
const targetContainer = document.getElementById('container-b');

targetContainer.appendChild(boxToMove);
After this code executes, your HTML structure becomes:
<div id="container-a">
  <!-- movable-box is no longer here -->
</div>

<div id="container-b">
  I'm waiting for content...
  <div id="movable-box">
    I can be moved!
  </div>
</div>
This fundamental technique is what powers our interactive div mover. Now let's build a complete, styled application that demonstrates this concept in action.
Step 1: Create the Basic HTML Structure
Let's start with the foundation - a simple HTML structure with two columns and a button.
<!DOCTYPE html>
<html lang="en">
<head>
    <meta charset="UTF-8">
    <meta name="viewport" content="width=device-width, initial-scale=1.0">
    <title>Div Mover</title>
</head>
<body>
    <div class="container">
        <h1>Div Mover Demo</h1>

        <div class="columns">
            <div class="column" id="leftColumn">
                <h2>Left Column</h2>
                <div class="movable-div" id="movableDiv">
                    I'm a movable div!
                </div>
            </div>

            <div class="column" id="rightColumn">
                <h2>Right Column</h2>
                <p id="waitingMessage">Waiting for the div to arrive...</p>
            </div>
        </div>

        <button class="move-button" onclick="moveDiv()">
            Move Div →
        </button>
    </div>
</body>
</html>
This gives us the basic structure: two columns with IDs for Javascript targeting, a movable div that starts in the left column, and a button to trigger the movement.
Notice how we've strategically assigned IDs to key elements: leftColumn, rightColumn, movableDiv, and waitingMessage. These IDs are crucial for our Javascript functionality. In Javascript, we'll use document.getElementById() to get references to these elements, which allows us to manipulate them programmatically.
Here's what we'll need to do later:
- Get a reference to the div element we want to move (movableDiv).
- Get references to both target containers (leftColumn and rightColumn).
- Get a reference to the waiting message so we can move it to the opposite column.
- Use these references to change the parent-child relationships in the DOM.
The key insight is that when we call appendChild() on an element that already exists in the DOM, it automatically removes the element from its current parent and adds it to the new parent. This is exactly what we need to "move" our div from one column to another - we're literally changing its parent element in the DOM tree.
Step 2: Add CSS Styling for Visual Appeal
Now let's make it look professional with modern CSS styling, including flexbox layout and visual effects.
<style>
    body {
        font-family: Arial, sans-serif;
        padding: 20px;
        background-color: #f5f5f5;
    }

    .container {
        max-width: 800px;
        margin: 0 auto;
    }

    .columns {
        display: flex;
        gap: 20px;
        margin-bottom: 20px;
    }

    .column {
        flex: 1;
        min-height: 300px;
        border: 2px solid #333;
        border-radius: 10px;
        padding: 20px;
        background-color: white;
        box-shadow: 0 2px 5px rgba(0,0,0,0.1);
    }

    .movable-div {
        background: linear-gradient(45deg, #ff6b6b, #4ecdc4);
        color: white;
        padding: 20px;
        border-radius: 8px;
        margin: 10px 0;
        text-align: center;
        font-weight: bold;
        transition: all 0.3s ease;
    }

    .move-button {
        display: block;
        margin: 20px auto;
        padding: 12px 30px;
        font-size: 16px;
        background: linear-gradient(45deg, #667eea, #764ba2);
        color: white;
        border: none;
        border-radius: 25px;
        cursor: pointer;
        transition: all 0.3s ease;
    }
</style>
The CSS creates a responsive two-column layout with modern styling, gradients, and smooth transitions that make the interface feel polished and interactive. We're using flexbox for the column layout, which automatically distributes space evenly between our two columns and handles responsive behavior gracefully.
The gradient backgrounds add visual appeal, while the transition properties ensure smooth animations when users interact with elements. The border-radius and box-shadow properties give everything a modern, elevated appearance that feels professional and engaging.
Step 3: Implement the Javascript Logic
Here's where the magic happens - the Javascript function that actually moves the div between columns. This is where all those IDs we assigned in Step 1 come into play.
<script>
    let isInLeftColumn = true;

    function moveDiv() {
        const movableDiv = document.getElementById('movableDiv');
        const leftColumn = document.getElementById('leftColumn');
        const rightColumn = document.getElementById('rightColumn');
        const button = document.querySelector('.move-button');
        const waitingMessage = document.getElementById('waitingMessage');

        if (isInLeftColumn) {
            // Move from left to right
            rightColumn.appendChild(movableDiv);
            leftColumn.appendChild(waitingMessage);
            button.textContent = '← Move Div';
            isInLeftColumn = false;
        } else {
            // Move from right to left
            leftColumn.appendChild(movableDiv);
            rightColumn.appendChild(waitingMessage);
            button.textContent = 'Move Div →';
            isInLeftColumn = true;
        }
    }
</script>
Let's break down exactly what's happening here. First, we create references to all the elements we need to manipulate, just as we planned in Step 1. We use document.getElementById() to get handles on our movable div, both columns, and the waiting message. We also grab the button using querySelector() so we can update its text.
The core logic uses a boolean flag isInLeftColumn to track the current state. When the function runs, it checks this flag to determine which direction to move. If the div is currently in the left column, we move it to the right by calling rightColumn.appendChild(movableDiv). This is the key DOM manipulation technique - appendChild() automatically removes the element from its current parent and adds it to the new parent.
But we don't just move the div; we also move the waiting message in the opposite direction. When the div goes right, the waiting message goes left, ensuring that both columns always have content. We also update the button text to show the next direction of movement and flip our boolean flag to track the new state.
The beauty of this approach is that appendChild() handles all the complex DOM manipulation for us. We don't need to manually remove elements or track their positions - we simply specify the new parent, and the browser takes care of the rest. This demonstrates a fundamental principle of DOM manipulation: changing parent-child relationships is often simpler than it might initially appear.
Step 4: Add Status Tracking and User Feedback
Let's enhance the user experience by adding a status indicator and improving the visual feedback.
<div class="status" id="status">
    Current location: Left Column
</div>
// Add this to the moveDiv function
const status = document.getElementById('status');
if (isInLeftColumn) {
// ... existing code ...
status.textContent = 'Current location: Right Column';
} else {
// ... existing code ...
status.textContent = 'Current location: Left Column';
}Step 5: Test and Refine
The full code is below:
<!DOCTYPE html>
<html lang="en">
<head>
    <meta charset="UTF-8">
    <meta name="viewport" content="width=device-width, initial-scale=1.0">
    <title>Div Mover</title>
    <style>
        body {
            font-family: Arial, sans-serif;
            padding: 20px;
            background-color: #f5f5f5;
        }

        .container {
            max-width: 800px;
            margin: 0 auto;
        }

        .columns {
            display: flex;
            gap: 20px;
            margin-bottom: 20px;
        }

        .column {
            flex: 1;
            min-height: 300px;
            border: 2px solid #333;
            border-radius: 10px;
            padding: 20px;
            background-color: white;
            box-shadow: 0 2px 5px rgba(0,0,0,0.1);
        }

        .column h2 {
            margin-top: 0;
            color: #333;
            text-align: center;
        }

        .movable-div {
            background: linear-gradient(45deg, #ff6b6b, #4ecdc4);
            color: white;
            padding: 20px;
            border-radius: 8px;
            margin: 10px 0;
            text-align: center;
            font-weight: bold;
            box-shadow: 0 2px 10px rgba(0,0,0,0.2);
            transition: all 0.3s ease;
        }

        .movable-div:hover {
            transform: translateY(-2px);
            box-shadow: 0 4px 15px rgba(0,0,0,0.3);
        }

        .move-button {
            display: block;
            margin: 20px auto;
            padding: 12px 30px;
            font-size: 16px;
            font-weight: bold;
            color: white;
            background: linear-gradient(45deg, #667eea, #764ba2);
            border: none;
            border-radius: 25px;
            cursor: pointer;
            transition: all 0.3s ease;
            box-shadow: 0 4px 15px rgba(0,0,0,0.2);
        }

        .move-button:hover {
            transform: translateY(-2px);
            box-shadow: 0 6px 20px rgba(0,0,0,0.3);
        }

        .move-button:active {
            transform: translateY(0);
        }

        .status {
            text-align: center;
            margin-top: 10px;
            font-style: italic;
            color: #666;
        }
    </style>
</head>
<body>
    <div class="container">
        <h1 style="text-align: center; color: #333;">Div Mover Demo</h1>

        <div class="columns">
            <div class="column" id="leftColumn">
                <h2>Left Column</h2>
                <div class="movable-div" id="movableDiv">
                    🎯 I'm a movable div!<br>
                    Click the button to move me!
                </div>
            </div>

            <div class="column" id="rightColumn">
                <h2>Right Column</h2>
                <p style="color: #888; text-align: center;" id="waitingMessage">Waiting for the div to arrive...</p>
            </div>
        </div>

        <button class="move-button" onclick="moveDiv()">
            Move Div →
        </button>

        <div class="status" id="status">
            Current location: Left Column
        </div>
    </div>

    <script>
        let isInLeftColumn = true;

        function moveDiv() {
            const movableDiv = document.getElementById('movableDiv');
            const leftColumn = document.getElementById('leftColumn');
            const rightColumn = document.getElementById('rightColumn');
            const button = document.querySelector('.move-button');
            const status = document.getElementById('status');
            const waitingMessage = document.getElementById('waitingMessage');

            if (isInLeftColumn) {
                // Move from left to right
                rightColumn.appendChild(movableDiv);
                leftColumn.appendChild(waitingMessage);
                button.textContent = '← Move Div';
                status.textContent = 'Current location: Right Column';
                isInLeftColumn = false;
            } else {
                // Move from right to left
                leftColumn.appendChild(movableDiv);
                rightColumn.appendChild(waitingMessage);
                button.textContent = 'Move Div →';
                status.textContent = 'Current location: Left Column';
                isInLeftColumn = true;
            }
        }
    </script>
</body>
</html>
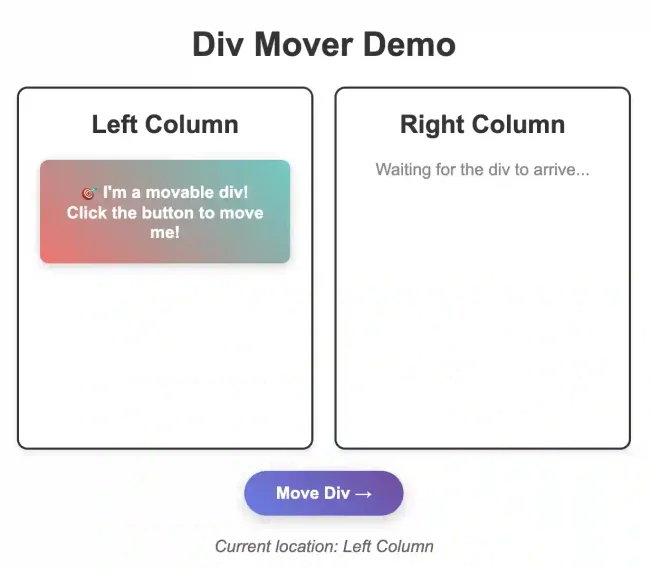
The site will look like:

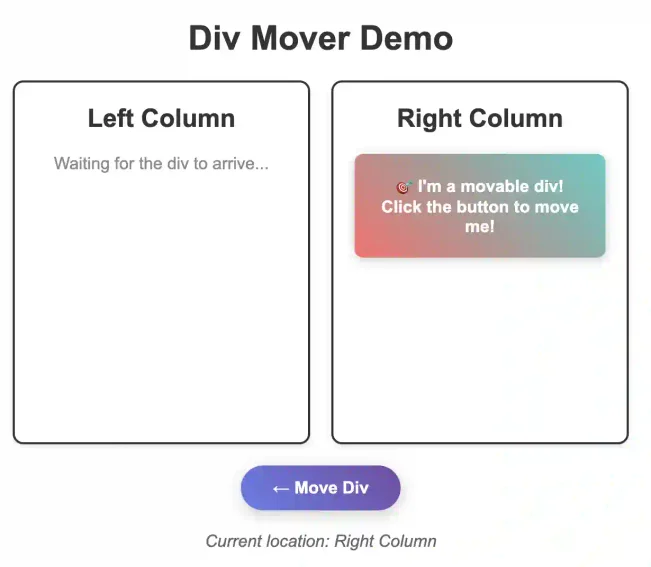
After you click "Move Div" it will look like:

and so on. You can test the functionality by clicking the button multiple times. You should see the div smoothly moving between columns, the button text updating to show the next direction, the waiting message appearing in the opposite column, and the status indicator updating correctly!
Conclusion
This simple div mover demonstrates fundamental DOM manipulation concepts while providing a solid foundation for more complex interactive web applications. The beauty lies in its simplicity - just a few lines of JavaScript can create engaging user interactions that help users understand how web elements can be dynamically restructured.
Want to learn Javascript with us? Sign up for 1:1 or small group classes.