Kodeclik Blog
How to make a fun Scratch Animation?
In this animation project, we will show you how to create a fascinating Scratch animation using very simple Scratch programming blocks. We have three sprites in our program. Two are planets orbiting at different radii at different speeds. As the planets move around we use a third sprite to draw lines connecting the planets. (The third sprite itself is invisible and its purpose is to simply draw these lines.) By changing the radii and the speed of the planets we can get fascinating designs.
What is Scratch Animation?
Scratch animation involves programming sprites in a way to make the sprites move around. It allows users to develop interactive stories, games, and animations by assembling code blocks, making the process both intuitive and educational. Utilizing a visual interface, Scratch enables aspiring animators to bring characters and scenes to life through simple drag-and-drop commands, fostering creativity and programming skills in a user-friendly environment. With its emphasis on accessibility and creativity, Scratch animation empowers users to explore their imagination while learning fundamental programming concepts.
Getting Started:
You will need a Scratch 3.0 account. You will also need the Pen extension that comes with Scratch 3.0. Scratch users can use your exiting account and new users can create an account at https://scratch.mit.edu
Step 1: Create First Planet Sprite in Scratch
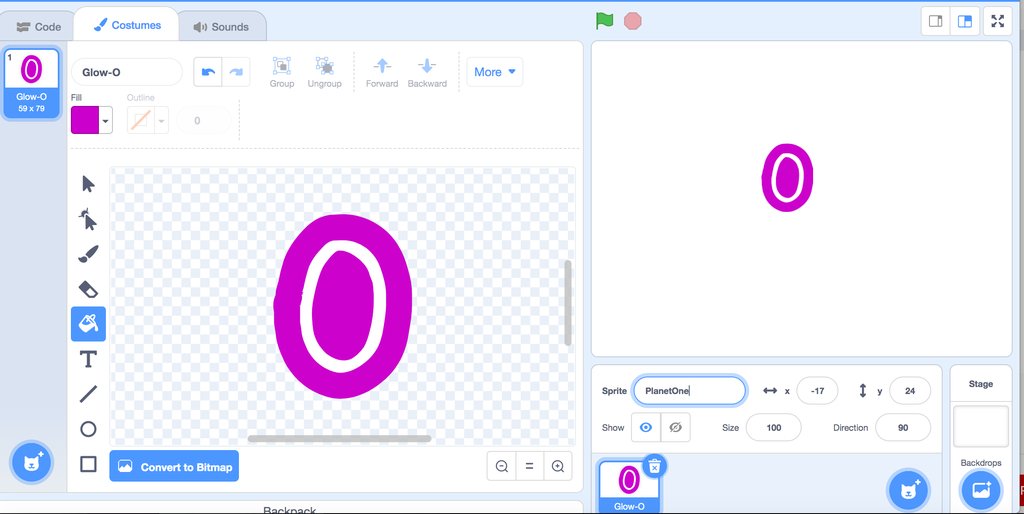
Create a new Scratch Program (clicking “Create” once you log in to scratch.mit.edu). Delete the cat sprite and add the “Glow-O” sprite (that looks like a planet). Goto the Costumes tab, use the Fill tool to change the color of the sprite. We will change the settings to make this planet have a magenta color. Rename the sprite to “PlanetOne”.
Step 2: Setup First Planet
Create two variables “Angle” and “Radius” using the MAKE VARIABLE block under VARIABLES (both for just this Sprite only). “Radius” affects the size of the circle that the planet moves around in. “Angle” varies from 0 to 360 degrees, completing one full orbit.
Then create two variables “magentax” and “magentay” (but make them global, i.e., FOR ALL SPRITES). These two variables denote the x and y co-ordinates of the magenta planet. We make these variables public because we want other sprites to have access to them.
Uncheck these variables in the VARIABLES tab because we don’t want them cluttering up the display.
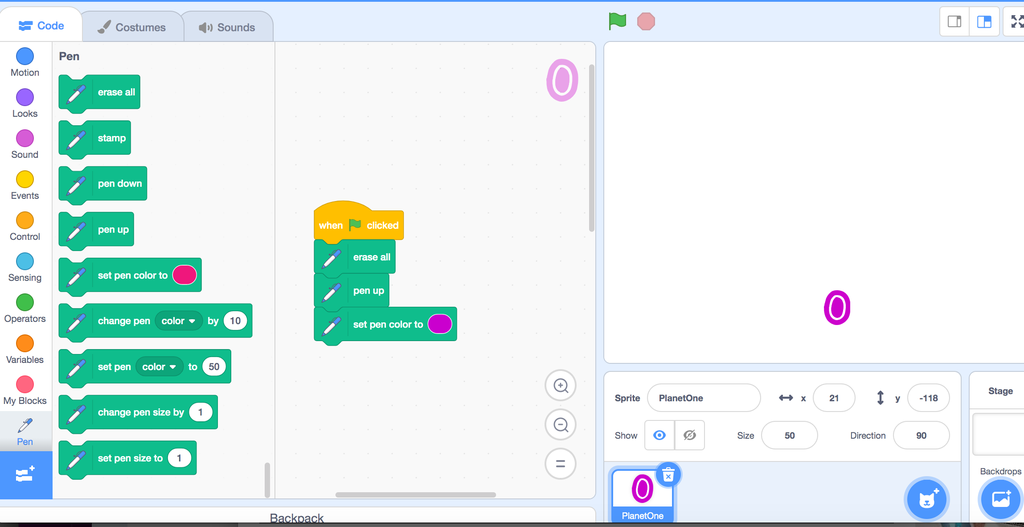
Clear the Screen (using the ERASE ALL block that comes with the PEN EXTENSION). Use the PEN UP block because we are not yet ready to start drawing. Use the Set Pen Color to block to set the color to have the same color as the Planet (you can look at the settings in the Costumes tab and use the same settings here for the Pen Color).
Finally use the SET SIZE TO block to set the planet’s size to 50%. Just bring this block to the workspace, adjust the value to 50%, click on it, and then discard it.
Step 3: Position First Planet
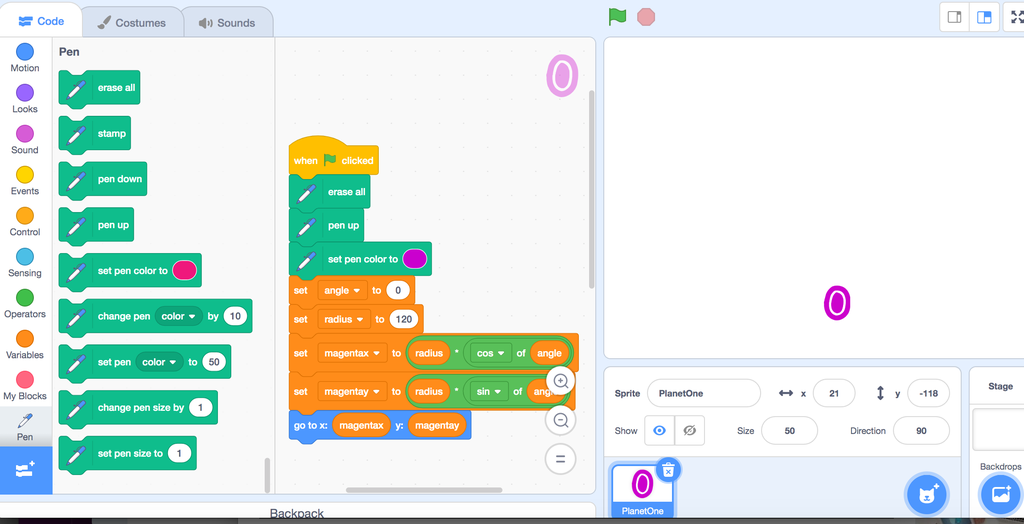
We are going to use basic trigonometry here. As the planet moves around, its x-coordinate moves as RADIUS times COSINE(ANGLE) where the angle varies from 0 to 360. Similarly, the y-coordinate moves as RADIUS times SINE(ANGLE). Let us position PlanetOne to its beginning position. We set the RADIUS and ANGLE, calculate the starting coordinates (MAGENTAX and MAGENTAY) and then move PlanetOne to that position. Note that pen is up so it will not draw a line as it moves to this position.
Step 4: Animate First Planet
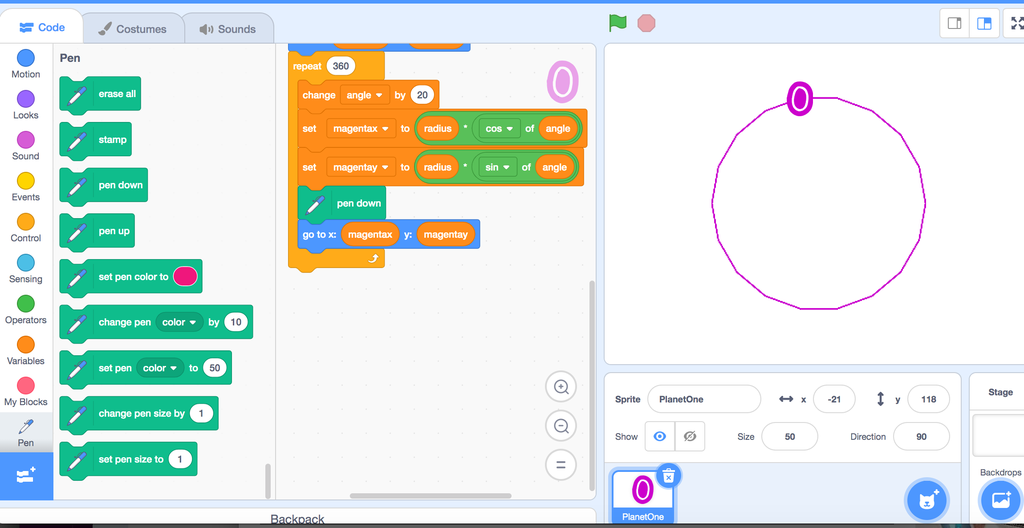
Now we are ready to move our first planet! Use a REPEAT loop to change the angle from 0 to 360 (in steps of 20; we can change this later), calculate the x and y coordinates at each angle, and use the PEN to draw the circle. Add the code seen this step to PlanetOne’s program thus far. Note that because we are changing in steps of 20, the “circle” appears a bit chunky. If you change it to, say, 1, it will look smoother (but keep it at 20 for now). Also note that if the angle step is 20 we don’t need the loop to repeat 360 times (only 180 times is sufficient) but let us keep it at 360 for now.
Step 5: Repeat Steps 1-4 for the Second Planet
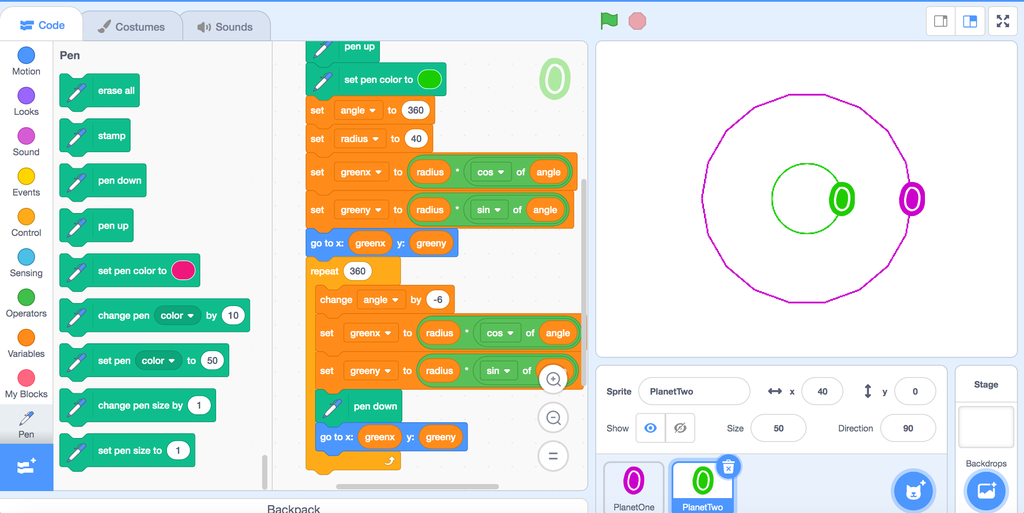
There are some key differences for the second planet.
First, we will use a different color, say, Green (so you will create variables called GREENX and GREENY that you will make accessible to other sprites.). This planet/sprite will still have its local ANGLE and RADIUS variables.
Second, set the RADIUS to be 40 since this planet will orbit in a smaller radius. We will also set the starting ANGLE to be 360 (s that it will orbit in the opposite direction).
Finally, inside the loop, change angle by -6 degrees in each step.
Step 6: Prepare to Draw Links Between the Two Planets As They Orbit

Load up a new sprite (we will use the Basketball sprite but it doesn’t matter since this sprite will be invisible). This sprite’s purpose is to track the locations of the two planets at each step and draw lines between them. But when should this sprite begin? It can begin when either of the two planets begin moving in their orbit. So we make PlanetOne broadcast a message (we call this message “StartDrawing”) and then the Basketball can wait for this message.
Step 7: Draw Links Between the Two Planets
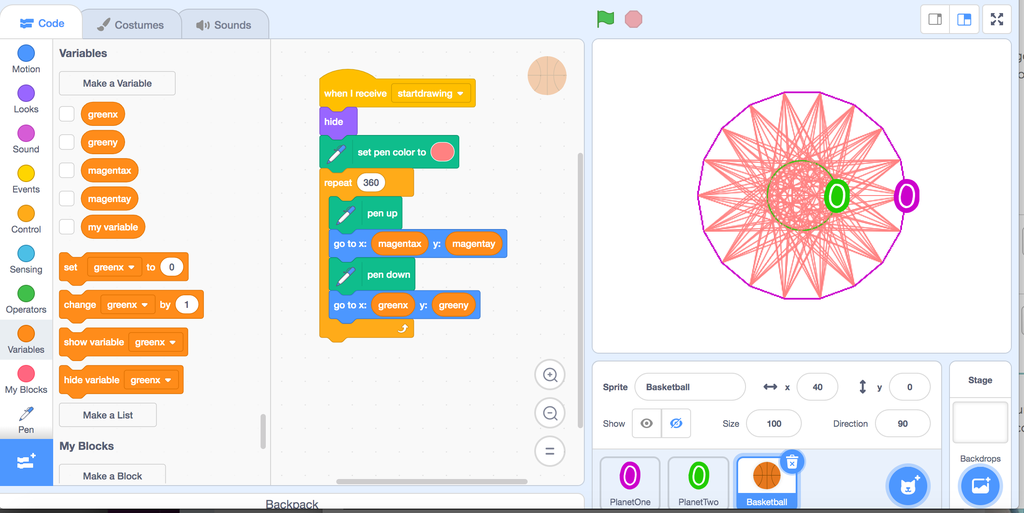
First, let us load up the Basketball sprite and we will make the Basketball’s pen color (not the actual color of the Sprite; remember this sprite will be hidden) to have a pinkish hue for an appealing design.
Then once the Basketball receives the message from PlanetOne it repeats (another loop of 360 times) drawing links between the two planets. We must be careful to do pen up to first move to the new location of the first planet and then pen down to draw to the other planet.
Step 8: Change the Backdrop to SkyBlue
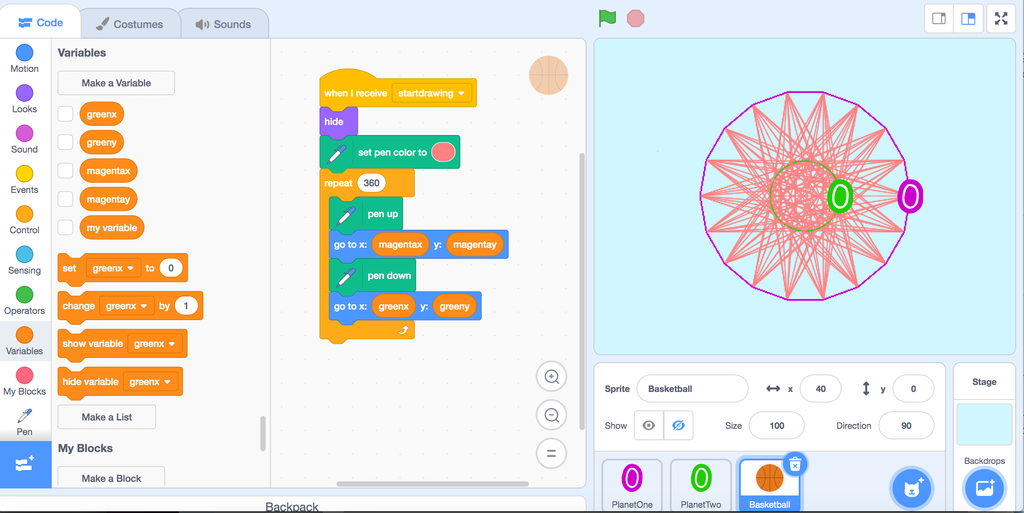
Goto the backdrop menu and change it to “Blue Sky 2”.
Congratulations! Try experimenting with different radii and different steps of angle changes inside the for loops to get more intricate and beautiful designs!
Possible types of Scratch Animation
Beginners and experienced users alike utilize Scratch to create a wide range of animations, from simple to sophisticated. Examples include:
Character Animations: Users animate sprites to walk, jump, dance, or perform various actions, demonstrating basic movement and timing techniques.
Interactive Stories: Animations that unfold based on user interactions, where viewers can choose different paths or outcomes, enhancing storytelling and engagement.
Educational Animations: Projects that explain scientific concepts, historical events, or mathematical principles through animated sequences, making learning interactive and engaging.
Games: Animated games where characters interact with obstacles, collect items, or solve puzzles, showcasing animated sequences as rewards or challenges.
Music Visualizations: Animations synchronized with music, where visual elements react to beats, notes, or changes in tempo, creating dynamic and immersive experiences.
Simulations: Animated simulations of natural phenomena, such as weather patterns, ecological systems, or physical experiments, illustrating complex processes in a visual format.
Short Films: Complete animated narratives or scenes created with Scratch, demonstrating storytelling skills and technical animation prowess.
These examples illustrate how Scratch empowers users to explore animation techniques, storytelling, and interactive design, fostering creativity and learning through hands-on projects.
Conclusion
In conclusion, exploring the realm of Scratch animation opens up a world of creativity and learning for aspiring young minds. MIT Scratch 3.0 provides a user-friendly platform where children can effortlessly develop interactive stories, games, and animations by simply dragging and dropping code blocks. This accessible approach not only fosters creativity but also nurtures fundamental programming skills in an engaging manner. By bringing characters and scenes to life through intuitive commands, Scratch animation empowers users to explore their imagination and realize their storytelling ambitions.
Moreover, Scratch animation serves as a powerful educational tool, seamlessly blending art and technology to teach essential concepts in a playful environment. It encourages experimentation and problem-solving, as children learn to design, animate, and interact with their creations. Whether crafting a whimsical character dance or simulating scientific phenomena, each project in Scratch fosters both technical proficiency and creative expression.
With its emphasis on accessibility and educational value, Scratch animation continues to inspire young learners worldwide, providing a solid foundation in programming while sparking a lifelong passion for animation and digital creation. Through this innovative platform, children not only discover the joy of animation but also develop critical skills that prepare them for future challenges in the digital age.
Next Steps
Want to learn Scratch with us? Sign up for Scratch Programming online class.
