Kodeclik Blog
Step-by-step Guide to Building a Snowday Calculator
Let us build a snowday calculator! But before we get into the nitty gritty details, here's the snow day calculator for you to experiment with! Go ahead and enter your zip code and the type of your school and see the results!
How it works
A Snow Day Calculator is a fun and practical tool for students, parents, teachers, and school administrators. It predicts the likelihood of school closures due to snow, using weather forecasts and local details. While many online calculators exist, most are outdated, require API keys, or don't blend well with modern websites.
In this tutorial, we’ll build a fully embeddable, visually appealing Snow Day Calculator widget. It will use only free, public APIs: first, we will use Zippopotam.us for ZIP code to latitude/longitude conversion, and then we will use the U.S. National Weather Service (NWS) API for official forecasts. The calculator will analyze the forecast for tomorrow and estimate the probability of a snow day based on snow predictions, temperature, wind, and school type. We'll walk through the logic, styling, and code, so you can easily add this widget to any website.
Step 1: Setting Up the Calculator Container
First, decide where you want your calculator to appear. Add a unique <div> in your HTML where the widget will be injected. This ensures the calculator won’t interfere with other page components.
<div id="snowday-calculator"></div>This container will hold all the calculator’s HTML, CSS, and JavaScript.
Step 2: Scoping the Styles
To prevent style conflicts with the rest of your site, we’ll use CSS selectors scoped to the calculator’s container. This keeps the calculator visually distinct and avoids accidental overrides.
const style = document.createElement('style');
style.textContent = `
#snowday-calculator .snowday-container {
  background: #fff;
  max-width: 400px;
  margin: 40px auto;
  padding: 2rem 2.5rem;
  border-radius: 18px;
  box-shadow: 0 8px 32px rgba(0,0,0,0.15);
  text-align: center;
}
#snowday-calculator h1 {
  margin-bottom: 1.5rem;
  color: #22577a;
}
#snowday-calculator form {
  display: flex;
  flex-direction: column;
  gap: 1.2rem;
}
#snowday-calculator input,
#snowday-calculator select {
  padding: 0.7rem 1rem;
  border: 1.5px solid #22577a;
  border-radius: 8px;
  font-size: 1rem;
  transition: border 0.2s;
}
#snowday-calculator input:focus,
#snowday-calculator select:focus {
  border-color: #38a3a5;
  outline: none;
}
#snowday-calculator button {
  padding: 0.8rem;
  background: linear-gradient(90deg, #38a3a5 0%, #57cc99 100%);
  color: #fff;
  border: none;
  border-radius: 8px;
  font-weight: bold;
  font-size: 1.1rem;
  cursor: pointer;
  transition: background 0.2s;
}
#snowday-calculator button:hover {
  background: linear-gradient(90deg, #57cc99 0%, #38a3a5 100%);
}
#snowday-result {
  margin-top: 2rem;
  font-size: 1.15rem;
  min-height: 2.5rem;
}
#snowday-calculator .forecast-details,
#snowday-calculator .forecast-summary {
  color: #4A90E2;
}
`;
document.head.appendChild(style);
Step 3: Injecting the Calculator HTML
Next, inject the calculator’s HTML into the container. All IDs and classes are prefixed to avoid collisions. Note that we are asking for two inputs, the zip code and the type of school (whether this is a public school, private school, or a college/university).
Note that weather can vary dramatically even within the same city. By asking for the ZIP code, we can fetch the precise weather forecast for the user’s specific area, ensuring the prediction is based on local snowfall, temperature, and wind conditions.
Secondly, we ask for the school type because, for instance, public schools often have strict safety policies and may close more readily due to transportation concerns or district-wide decisions. Private schools, being smaller or more flexible, might stay open longer or close independently. Finally, universities and colleges are typically less likely to close for snow. They often have residential students, more robust facilities, and expect adults to manage moderate weather. As a result, the calculator adjusts the probability downward for this category.
You will see the details soon!
document.getElementById('snowday-calculator').innerHTML = `
  <div class="snowday-container">
    <h1>Snow Day Calculator</h1>
    <form id="snowday-form" autocomplete="off">
      <input type="text" id="snowday-zip" name="zip" placeholder="Enter ZIP Code" required pattern="\\d{5}">
      <select id="snowday-school-type" name="school-type" required>
        <option value="" disabled selected>Select School Type</option>
        <option value="public">Public School</option>
        <option value="private">Private School</option>
        <option value="university">University/College</option>
      </select>
      <button type="submit">Calculate</button>
    </form>
    <div id="snowday-result"></div>
  </div>
`;
Step 4: Fetching Weather Data with Free APIs
When the form is submitted, the calculator fetches the latitude and longitude for the ZIP code using Zippopotam.us, then queries the National Weather Service for tomorrow’s forecast. This avoids the need for any API keys.
The first step, i.e., converting zip code to latitude and longitude is essential because weather APIs, especially the National Weather Service (NWS), require geographic coordinates rather than ZIP codes to provide accurate, hyper-local forecasts. The code checks for successful responses and handles errors gracefully—if the ZIP code is invalid or not found, the user immediately receives a clear error message.
Once the latitude and longitude are obtained, the calculator sends a second API request to the NWS “points” endpoint, passing in these coordinates. The NWS responds with metadata about the location, including a URL for the relevant forecast grid.
The code then fetches the detailed forecast for that specific area, again checking for errors at each step. By chaining these asynchronous requests, the calculator ensures it always uses the most up-to-date and location-specific weather data.
document.getElementById('snowday-form').addEventListener('submit', async function(e) {
  e.preventDefault();
  const zip = document.getElementById('snowday-zip').value.trim();
  const schoolType = document.getElementById('snowday-school-type').value;
  const resultDiv = document.getElementById('snowday-result');
  resultDiv.textContent = 'Calculating...';

  try {
    // Get coordinates from ZIP code
    const geoRes = await fetch(`https://api.zippopotam.us/us/${zip}`);
    if (!geoRes.ok) throw new Error('ZIP code not found. Please check and try again.');
    const geoData = await geoRes.json();
    const lat = geoData.places[0].latitude;
    const lon = geoData.places[0].longitude;
    const placeName = `${geoData.places[0]['place name']}, ${geoData.places[0]['state abbreviation']}`;

    // Get NWS forecast grid endpoint
    const pointsRes = await fetch(
      `https://api.weather.gov/points/${lat},${lon}`,
      { headers: { 'User-Agent': 'snowday-calculator (contact@example.com)' } }
    );
    if (!pointsRes.ok) throw new Error('Weather data not found for this location.');
    const pointsData = await pointsRes.json();
    const forecastUrl = pointsData.properties.forecast;

    // Fetch the forecast
    const forecastRes = await fetch(
      forecastUrl,
      { headers: { 'User-Agent': 'snowday-calculator (contact@example.com)' } }
    );
    if (!forecastRes.ok) throw new Error('No forecast found for this location.');
    const forecastData = await forecastRes.json();

    // ... (processing and display logic follows)
  } catch (err) {
    resultDiv.textContent = 'Error: ' + err.message;
  }
});
Step 5: Calculating Snow Day Probability
The calculator analyzes tomorrow’s forecast for snow, cold, and wind, and adjusts the probability based on school type. If there’s no snow predicted, the probability is always zero.
// Find tomorrow's forecast periods
const periods = forecastData.properties.periods;
const now = new Date();
const tomorrow = new Date(now.getTime() + 24 * 60 * 60 * 1000);

// Format tomorrow's date for display
const options = { month: 'short', day: 'numeric', year: 'numeric' };
const tomorrowDateStr = tomorrow.toLocaleDateString('en-US', options);

const tomorrowPeriods = periods.filter(p => {
  const pDate = new Date(p.startTime);
  return pDate.getDate() === tomorrow.getDate();
});

if (tomorrowPeriods.length === 0) throw new Error('No forecast for tomorrow found.');

// Analyze snow, temp, wind
let totalSnow = 0, minTemp = 1000, maxWind = 0, snowMentioned = false;
tomorrowPeriods.forEach(p => {
  if (/snow/i.test(p.shortForecast) || /snow/i.test(p.detailedForecast)) {
    snowMentioned = true;
  }
  const snowMatch = p.detailedForecast.match(/(\d+(\.\d+)?)\s?inch(es)? of snow/i);
  if (snowMatch) totalSnow += parseFloat(snowMatch[1]);
  if (typeof p.temperature === "number" && p.temperature < minTemp) minTemp = p.temperature;
  const windMatch = p.windSpeed.match(/(\d+)(\s*to\s*(\d+))?/);
  if (windMatch) {
    const windSpeed = windMatch[3] ? parseInt(windMatch[3]) : parseInt(windMatch[1]);
    if (windSpeed > maxWind) maxWind = windSpeed;
  }
});

// Calculate probability
let probability = 0;
if (!snowMentioned && totalSnow === 0) {
  probability = 0;
} else {
  if (totalSnow >= 3) probability += 40;
  else if (totalSnow >= 1) probability += 25;
  else if (snowMentioned) probability += 15;
  if (minTemp < 25) probability += 15;
  if (maxWind > 15) probability += 10;
  if (schoolType === 'public') probability += 10;
  else if (schoolType === 'private') probability += 5;
  if (schoolType === 'university') probability -= 10;
  probability = Math.max(0, Math.min(100, Math.round(probability)));
}
Note that the code scans the forecast’s text for any mention of “snow” in both the brief and detailed descriptions. If snow is not mentioned and no snow accumulation is predicted, the calculator immediately sets the probability to zero—no snow, no snow day.
If the forecast includes a specific amount of snow (e.g., “2 inches of snow expected”), this value is extracted and used in the probability formula.
Note that the code also factors in temperate and wind. Finally, we also adjust for school type.
All of this is admittedly heuristic. However, this basic strategy balances simplicity and realism. It ensures that users only see a nonzero snow day chance when snow is actually predicted, and it reflects how different weather conditions and school policies interact in real-world closure decisions. The result is a practical, easy-to-understand estimate that feels both personalized and trustworthy.
You can easily modify this code to create more complex probability estimation models!
Step 6: Displaying Results With Styled Output
Finally, show the results with clear, color-coded text. The main result lines use a dark blue, while the forecast details and summary use a lighter blue for emphasis.
resultDiv.innerHTML = `
  <b style="color:#4A90E2">Snow Day Probability:</b> <span style="color:#003366">${probability}%</span><br>
  <small style="color:#003366">
    (${placeName}, ${tomorrowDateStr}: Tomorrow's forecast - ${totalSnow ? totalSnow.toFixed(1) + ' in. snow, ' : ''}
    ${minTemp !== 1000 ? 'low ' + minTemp + '°F, ' : ''}max wind ${maxWind} mph)
  </small>
  <br>
  <details style="margin-top:0.5em;">
    <summary class="forecast-summary">Show forecast</summary>
    <div class="forecast-details">
      ${tomorrowPeriods.map(p => `<div style="margin-bottom:0.5em;"><b>${p.name}:</b> ${p.shortForecast}<br><small>${p.detailedForecast}</small></div>`).join('')}
    </div>
  </details>
`;
Step 7: Test your calculator!
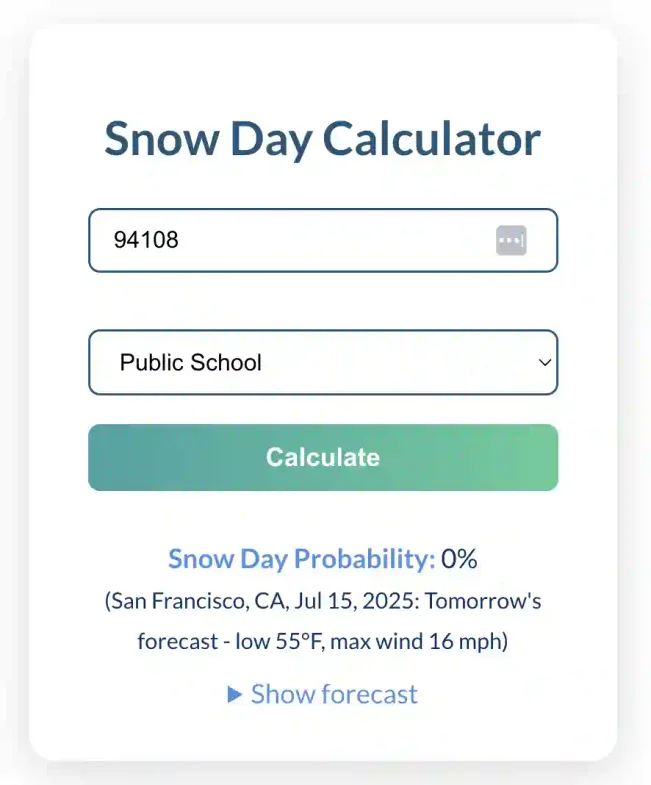
Lets take our calculator out for a spin! If we enter, say, the zip code for San Francisco, you should see output like this:

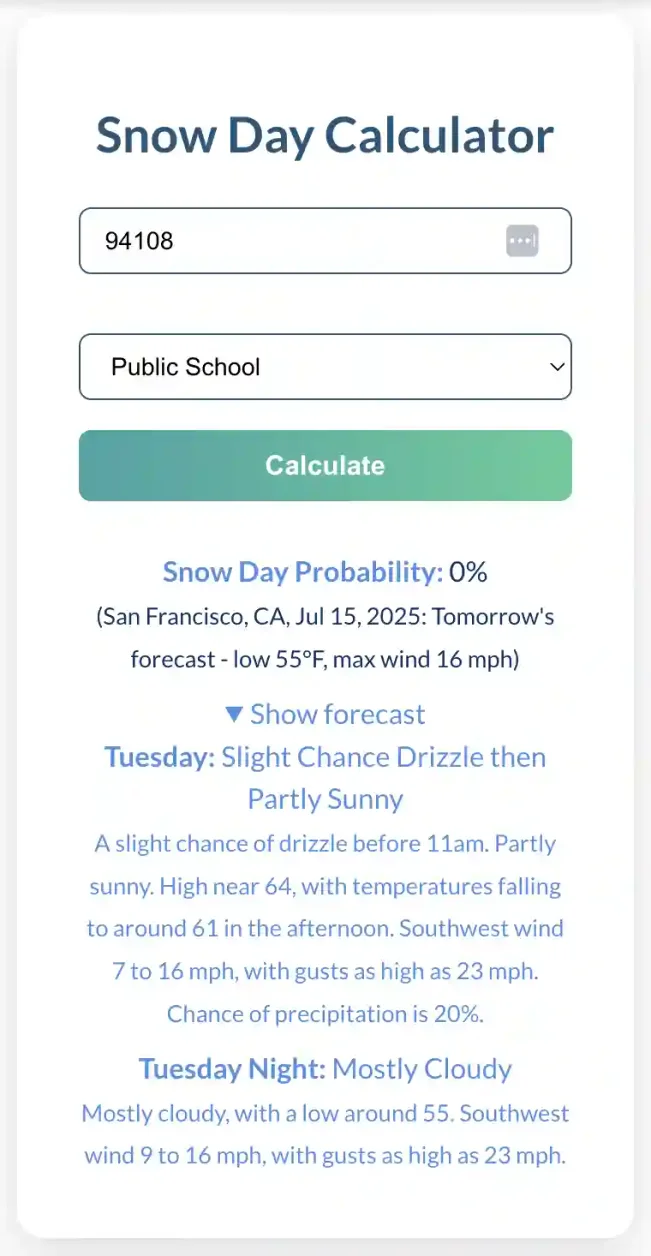
If you click the "Show Forecast" button, the output will be expanded to show:

Go ahead and try it with your own zip code!
Conclusion
By following these steps, you’ve created a modern, embeddable Snow Day Calculator that’s easy to add to any webpage. It uses only free APIs, requires no keys, and is visually isolated from the rest of your site. You can further customize the logic, styling, and display to fit your audience—whether you’re a teacher, parent, or web developer looking to add a little winter magic to your site!
Want to learn Javascript with us? Sign up for 1:1 or small group classes.