Kodeclik Blog
Learn to make pizza with Javascript
Let us learn about object-oriented programming in Javascript using a favorite topic, pizza! In this tutorial, we’ll build a pizza creator and eater app from scratch. Along the way, you’ll learn how to use enumerations, classes, methods, and state management—all essential concepts in OOP. Plus, you’ll see how to bring your code to life with a simple web interface.
Whether you’re new to Javascript or looking to sharpen your skills, this deliciously themed project will make learning both fun and memorable.
Why Pizza? A Tasty Approach to OOP Concepts
Pizza is a great metaphor for object-oriented programming. Each pizza has properties (like size, crust, toppings) and behaviors (like eating a slice or devouring the whole thing). By modeling pizzas as objects, you’ll see how OOP helps organize code in a logical, reusable way.
Step 1: Defining Pizza Properties with Enums and Classes
We’ll start by defining our pizza’s possible sizes and crusts using enumerations. Then, we’ll create a Pizza class to encapsulate all the pizza’s properties and behaviors.
Before we dive into the code, let’s clarify what we’re modeling. Each pizza is defined by a few key properties:
- Size: Every pizza can be either Small, Medium, or Large. The size affects not only how much pizza you get, but also the base price.
- Crust: The crust can be Thin, Thick, or Stuffed—because everyone has a favorite!
- Toppings: Toppings are chosen from a set of options, and you can add as many as you like. Each topping adds a little extra to the cost.
- Slices: Every pizza starts with 8 slices, and as you eat, the number of slices decreases.
We’ll use Javascript objects (as simple enums) to represent the allowed values for size and crust. The base cost of the pizza depends on its size, and each topping has a fixed additional cost. All of this will be encapsulated in a Pizza class, which will manage the pizza’s state and behaviors.
Here’s how we define these core properties and our Pizza class:
// Enumerations for size and crust
const PizzaSize = {
SMALL: 'Small',
MEDIUM: 'Medium',
LARGE: 'Large'
};
const PizzaCrust = {
THIN: 'Thin',
THICK: 'Thick',
STUFFED: 'Stuffed'
};
// Base cost for each size
const BASE_COSTS = {
Small: 8,
Medium: 10,
Large: 12
};
const TOPPING_COST = 1.5;
class Pizza {
constructor(size, crust, toppings = []) {
this.size = size;
this.crust = crust;
this.toppings = new Set(toppings);
this.slices = 8;
}
Note that we first create enumerations for pizza sizes and crust types, ensuring that only valid options like "Small," "Medium," or "Large" for size, and "Thin," "Thick," or "Stuffed" for crust can be selected. The code then establishes the base cost for each pizza size in the BASE_COSTS object and sets a fixed cost for each additional topping.
The Pizza class itself is designed to represent an individual pizza, with properties for size, crust, and a set of chosen toppings, as well as a default of 8 slices. By organizing these values and behaviors, the code gives us a flexible and extensible way to represent pizzas in our Javascript application.
Step 2: Giving Life to Our Pizza: Eating Methods and State Management
Now that we’ve defined what a pizza is, let’s make it interactive! In object-oriented programming, objects aren’t just static data—they have behaviors. For our Pizza class, this means adding methods that let us "eat" the pizza, either one slice at a time or all at once (we will call it “devouring”).
We’ll also add properties to check if the pizza is untouched, partly eaten, or fully devoured. These methods and computed properties help us manage the pizza’s state as it gets eaten, making our code both dynamic and realistic.
Here’s how we implement these behaviors in our Pizza class. Note that the constructor is the same as what we had before, we are just re-including it in this step so you understand the overall flow:
class Pizza {
constructor(size, crust, toppings = []) {
this.size = size;
this.crust = crust;
this.toppings = new Set(toppings);
this.slices = 8;
}
// Calculate the total cost based on size and toppings
get cost() {
return BASE_COSTS[this.size] + (this.toppings.size * TOPPING_COST);
}
// Check if the pizza is untouched (full)
get isFull() {
return this.slices === 8;
}
// Check if the pizza is fully eaten
get isEaten() {
return this.slices === 0;
}
// Eat a single slice
eatSlice() {
if (this.slices > 0) this.slices--;
}
// Devour the whole pizza at once
devour() {
this.slices = 0;
}
}
In the above methods:
- The cost getter calculates the total price of the pizza based on its size and the number of toppings.
- The isFull getter checks if the pizza still has all 8 slices uneaten.
- The isEaten getter checks if the pizza has been completely consumed (zero slices left).
- The eatSlice method reduces the number of slices by one, simulating eating a single slice.
- The devour method sets the number of slices to zero, representing eating the entire pizza at once.
Step 3: Building an Interactive Web Interface
With our pizza logic defined in Javascript, it’s time to make things interactive and user-friendly. By creating a simple web interface, we allow users to choose their pizza’s size, crust, and toppings, and then interact with their pizza—eating slices or devouring it entirely—all with real-time updates on the pizza’s state and cost. This step demonstrates how Javascript can connect your data models to the user experience, making your code come alive in the browser.
Here’s the complete HTML, CSS, and Javascript for our interactive pizza maker and eater:
<!DOCTYPE html>
<html lang="en">
<head>
<meta charset="UTF-8">
<title>Pizza Maker</title>
<style>
body { font-family: Arial, sans-serif; margin: 2em; background-color: #f5f5dc; font-size: 18px; }
h1 { font-size: 1.5em; }
label, select, input { margin: 0.3em 0; }
.pizza-info { margin-top: 1em; padding: 1em; border: 1px solid #ccc; border-radius: 8px; background-color: #ffe4b5; }
.slices { font-weight: bold; }
button { margin-right: 0.5em; }
</style>
</head>
<body>
<h1>🍕 Pizza Creator & Eater</h1>
<form id="pizzaForm">
<label>Size:
<select id="size">
<option value="Small">Small</option>
<option value="Medium" selected>Medium</option>
<option value="Large">Large</option>
</select>
</label><br>
<label>Crust:
<select id="crust">
<option value="Thin">Thin</option>
<option value="Thick">Thick</option>
<option value="Stuffed">Stuffed</option>
</select>
</label><br>
<label>Toppings:<br>
<input type="checkbox" value="Pepperoni"> Pepperoni<br>
<input type="checkbox" value="Mushrooms"> Mushrooms<br>
<input type="checkbox" value="Onions"> Onions<br>
<input type="checkbox" value="Olives"> Olives<br>
<input type="checkbox" value="Peppers"> Peppers<br>
<input type="checkbox" value="Sausage"> Sausage<br>
</label><br>
<button type="submit">Create Pizza</button>
</form>
<div class="pizza-info" id="pizzaInfo" style="display:none;"></div>
<script>
// Enumerations and constants
const PizzaSize = { SMALL: 'Small', MEDIUM: 'Medium', LARGE: 'Large' };
const PizzaCrust = { THIN: 'Thin', THICK: 'Thick', STUFFED: 'Stuffed' };
const BASE_COSTS = { Small: 8, Medium: 10, Large: 12 };
const TOPPING_COST = 1.5;
class Pizza {
constructor(size, crust, toppings = []) {
this.size = size;
this.crust = crust;
this.toppings = new Set(toppings);
this.slices = 8;
}
get cost() {
return BASE_COSTS[this.size] + (this.toppings.size * TOPPING_COST);
}
get isFull() { return this.slices === 8; }
get isEaten() { return this.slices === 0; }
eatSlice() { if (this.slices > 0) this.slices--; }
devour() { this.slices = 0; }
}
let currentPizza = null;
const pizzaForm = document.getElementById('pizzaForm');
const pizzaInfo = document.getElementById('pizzaInfo');
pizzaForm.addEventListener('submit', function(e) {
e.preventDefault();
const size = document.getElementById('size').value;
const crust = document.getElementById('crust').value;
const toppingInputs = pizzaForm.querySelectorAll('input[type="checkbox"]:checked');
const toppings = Array.from(toppingInputs).map(input => input.value);
currentPizza = new Pizza(size, crust, toppings);
renderPizza();
});
function renderPizza() {
if (!currentPizza) return;
pizzaInfo.style.display = 'block';
pizzaInfo.innerHTML = `
<h2>Your Pizza</h2>
<p><strong>Size:</strong> ${currentPizza.size}</p>
<p><strong>Crust:</strong> ${currentPizza.crust}</p>
<p><strong>Toppings:</strong> ${Array.from(currentPizza.toppings).join(', ') || 'None'}</p>
<p><strong>Cost:</strong> $${currentPizza.cost.toFixed(2)}</p>
<p class="slices">Slices left: ${currentPizza.slices} / 8</p>
<p>Status: <strong>${currentPizza.isEaten ? 'Fully eaten!' : (currentPizza.isFull ? 'Untouched' : 'Partly eaten')}</strong></p>
<button onclick="eatSlice()">Eat 1 Slice</button>
<button onclick="devourPizza()">Devour Entire Pizza</button>
`;
}
window.eatSlice = function() {
if (currentPizza && currentPizza.slices > 0) {
currentPizza.eatSlice();
renderPizza();
}
};
window.devourPizza = function() {
if (currentPizza && currentPizza.slices > 0) {
currentPizza.devour();
renderPizza();
}
};
</script>
</body>
</html>
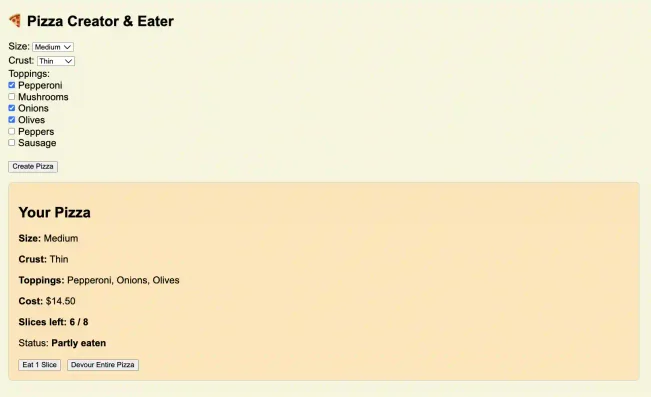
This interface lets users select their pizza’s size, crust, and toppings, then create a pizza object with those choices. The pizza’s details—including cost and number of slices left—are displayed dynamically. Two buttons allow users to eat one slice at a time or devour the whole pizza, with the interface updating in real time to reflect the pizza’s state. This demonstrates how Javascript can seamlessly connect your data models to an interactive user experience, a core principle of modern web development.
Here’s a snapshot of the pizza creator and eater in action!
Summary
Throughout this tutorial, we have explored how to apply core object-oriented programming principles in Javascript by modeling a pizza as a class with clearly defined properties and behaviors.
We used enumerations to restrict pizza sizes and crust types, and how to manage toppings as a set to dynamically calculate the pizza’s cost.
By adding methods to simulate eating slices or devouring the entire pizza, we encapsulated both the state and behavior of our pizza objects.
Finally, we connected this logic to a simple yet interactive web interface, demonstrating how Javascript classes can power real-time user experiences.
This project not only deepens your understanding of OOP concepts like encapsulation, state management, and methods, but also shows how to build engaging applications that are both functional and fun.
Extending this project
Here are several ways you could extend and enhance this pizza project:
- Add More Topping Options: Include a wider variety of toppings, such as pineapple, anchovies, or vegan cheese.
- Customize Slice Count: Allow users to choose how many slices their pizza has when creating it.
- Multiple Pizzas: Enable users to create, view, and eat multiple pizzas in one session, perhaps with a pizza "cart" or order history.
- Visual Pizza Representation: Display a graphical pizza that updates visually as slices are eaten or toppings are added.
- Save and Load Orders: Let users save their favorite pizza combinations and reload them later.
- Ingredient Restrictions: Prevent certain topping combinations (e.g., no meat on a vegetarian pizza).
- User Ratings and Reviews: Allow users to rate and review their pizza creations.
- Nutritional Information: Show calories or nutrition facts based on selected size, crust, and toppings.
These ideas can help you practice more advanced Javascript, UI/UX, and even full-stack development skills! Enjoy!
Checkout also our blogpost on how to make interactive menus in Javascript which will come in handy when you would like to restrict pizza topping/feature combinations!
Want to learn Javascript with us? Sign up for 1:1 or small group classes.