Kodeclik Blog
How to make your own Scratch Platformer Game
Platformers are an extremely popular genre of video game and while looking complicated can be easily coded using Scratch’s coding blocks.
What makes platformers popular? The simple yet addictive gameplay, coupled with engaging levels and vibrant characters, creates an immersive experience. From classics like Super Mario Bros. to contemporary indie hits like Celeste, platformer games have a timeless appeal that captivates players of all generations. Scratch, with its versatility, allows you to design and build your very own platformer games in an incremental manner, as we show here in this blogpost.
Before diving into creating your platformer game on Scratch, it's essential to understand the core mechanics that define the platformer genre. A platformer game typically involves controlling a character who navigates a two-dimensional world, overcoming obstacles, and collecting rewards. The character moves left and right, jumps, and interacts with various objects, platforms, and enemies. By mastering the art of level design and balancing challenges, you can create a platformer game that offers an enjoyable and engaging experience.
There are three main types of platformers. They are:
Level Based Platformers (No Scrolling): These platformers are ones that have several levels, where each level fits on your entire screen at once. Once the player completes the level, the screen changes to depict the next level.
Scrolling Platformers: These platformers have a background/scene that moves along as the character moves. These platformers can also have levels but they give the impression of a continuous, long-running landscape.
Endless Runner Platformers: These platformers go on forever with the player usually having to dodge obstacles until they die and are assigned a score based on how far they have progressed into the game.
Coding a Level Based Platformer
1. Open up a new Project in Scratch.
2. Delete the default Cat Sprite.
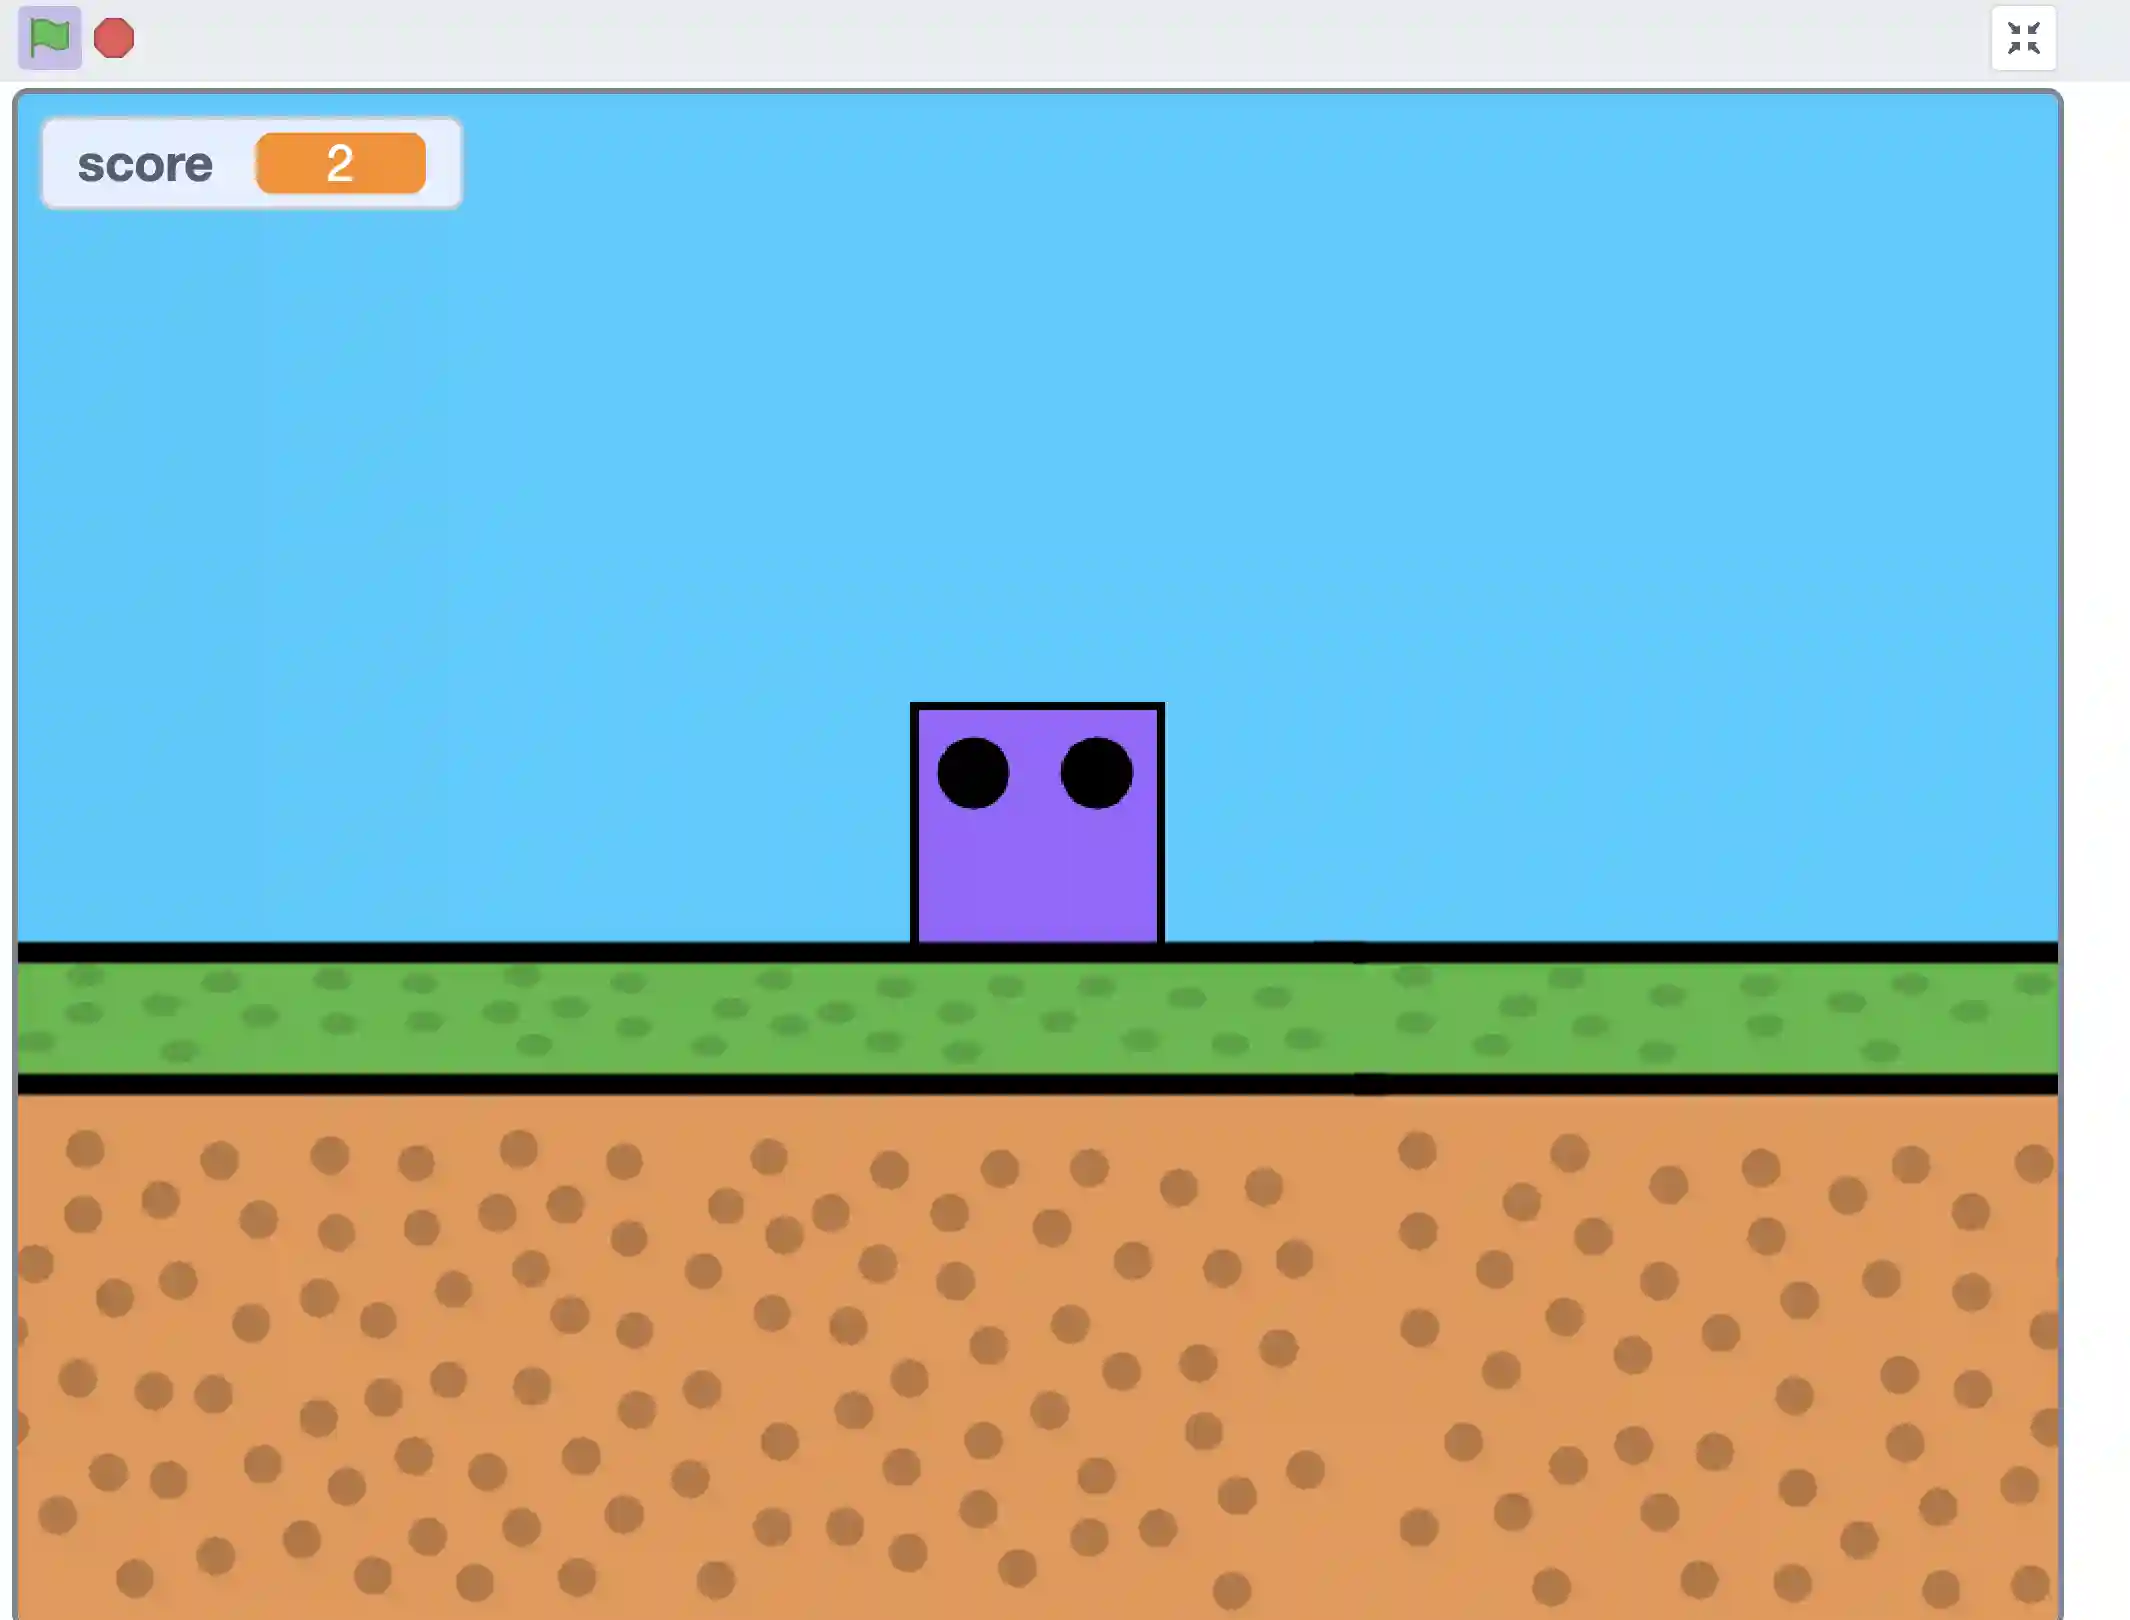
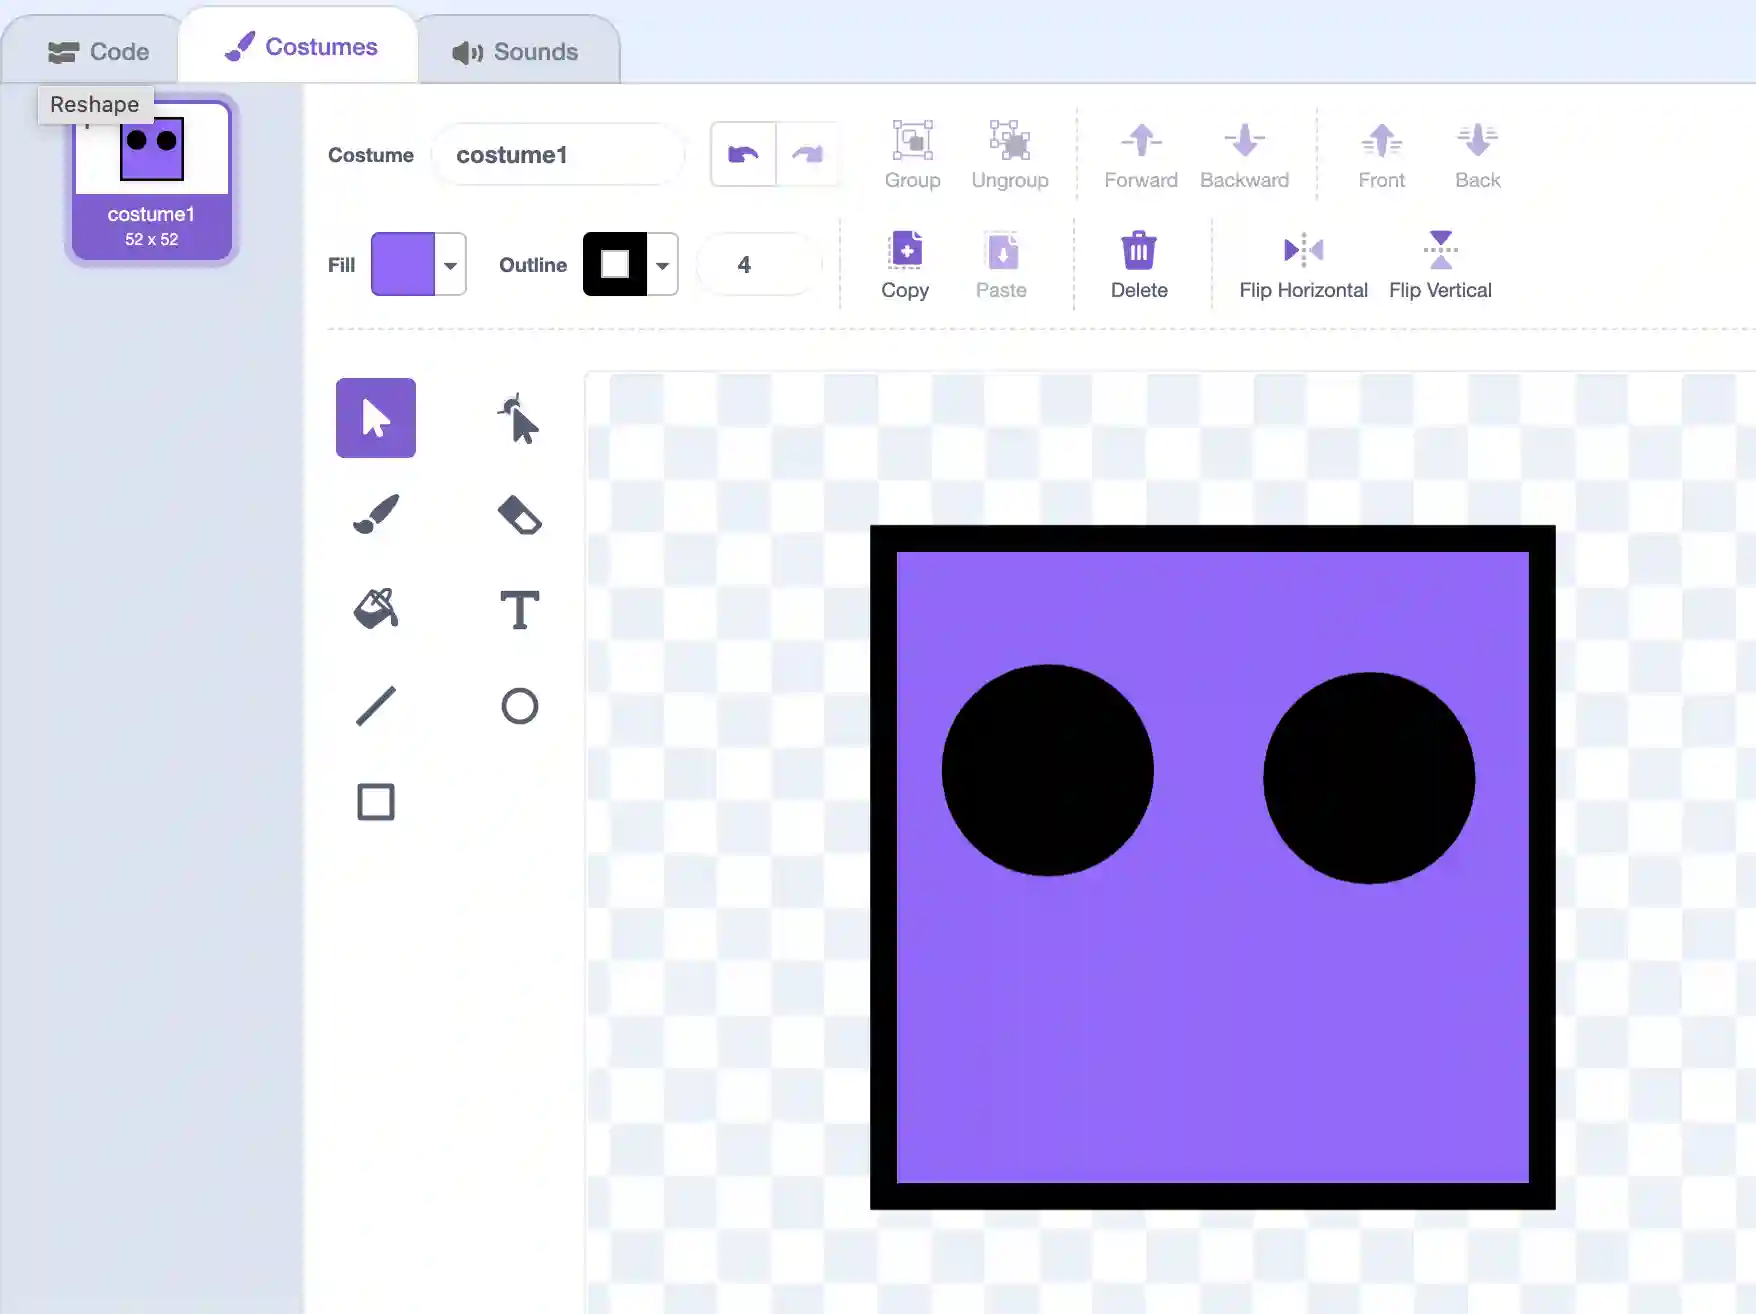
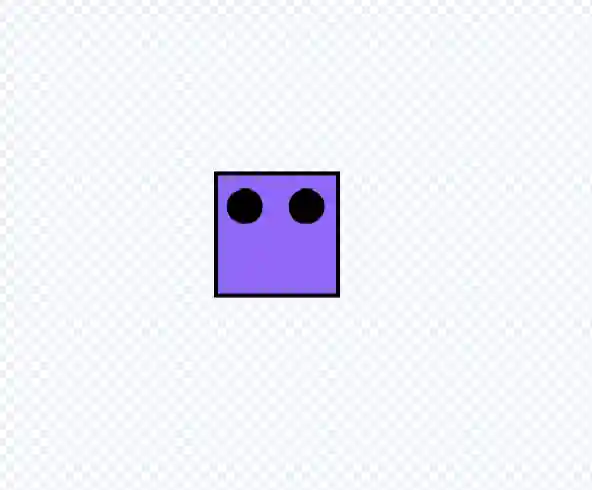
3. Create a new sprite to be the character of this game; you can draw it yourself like we have done here below.
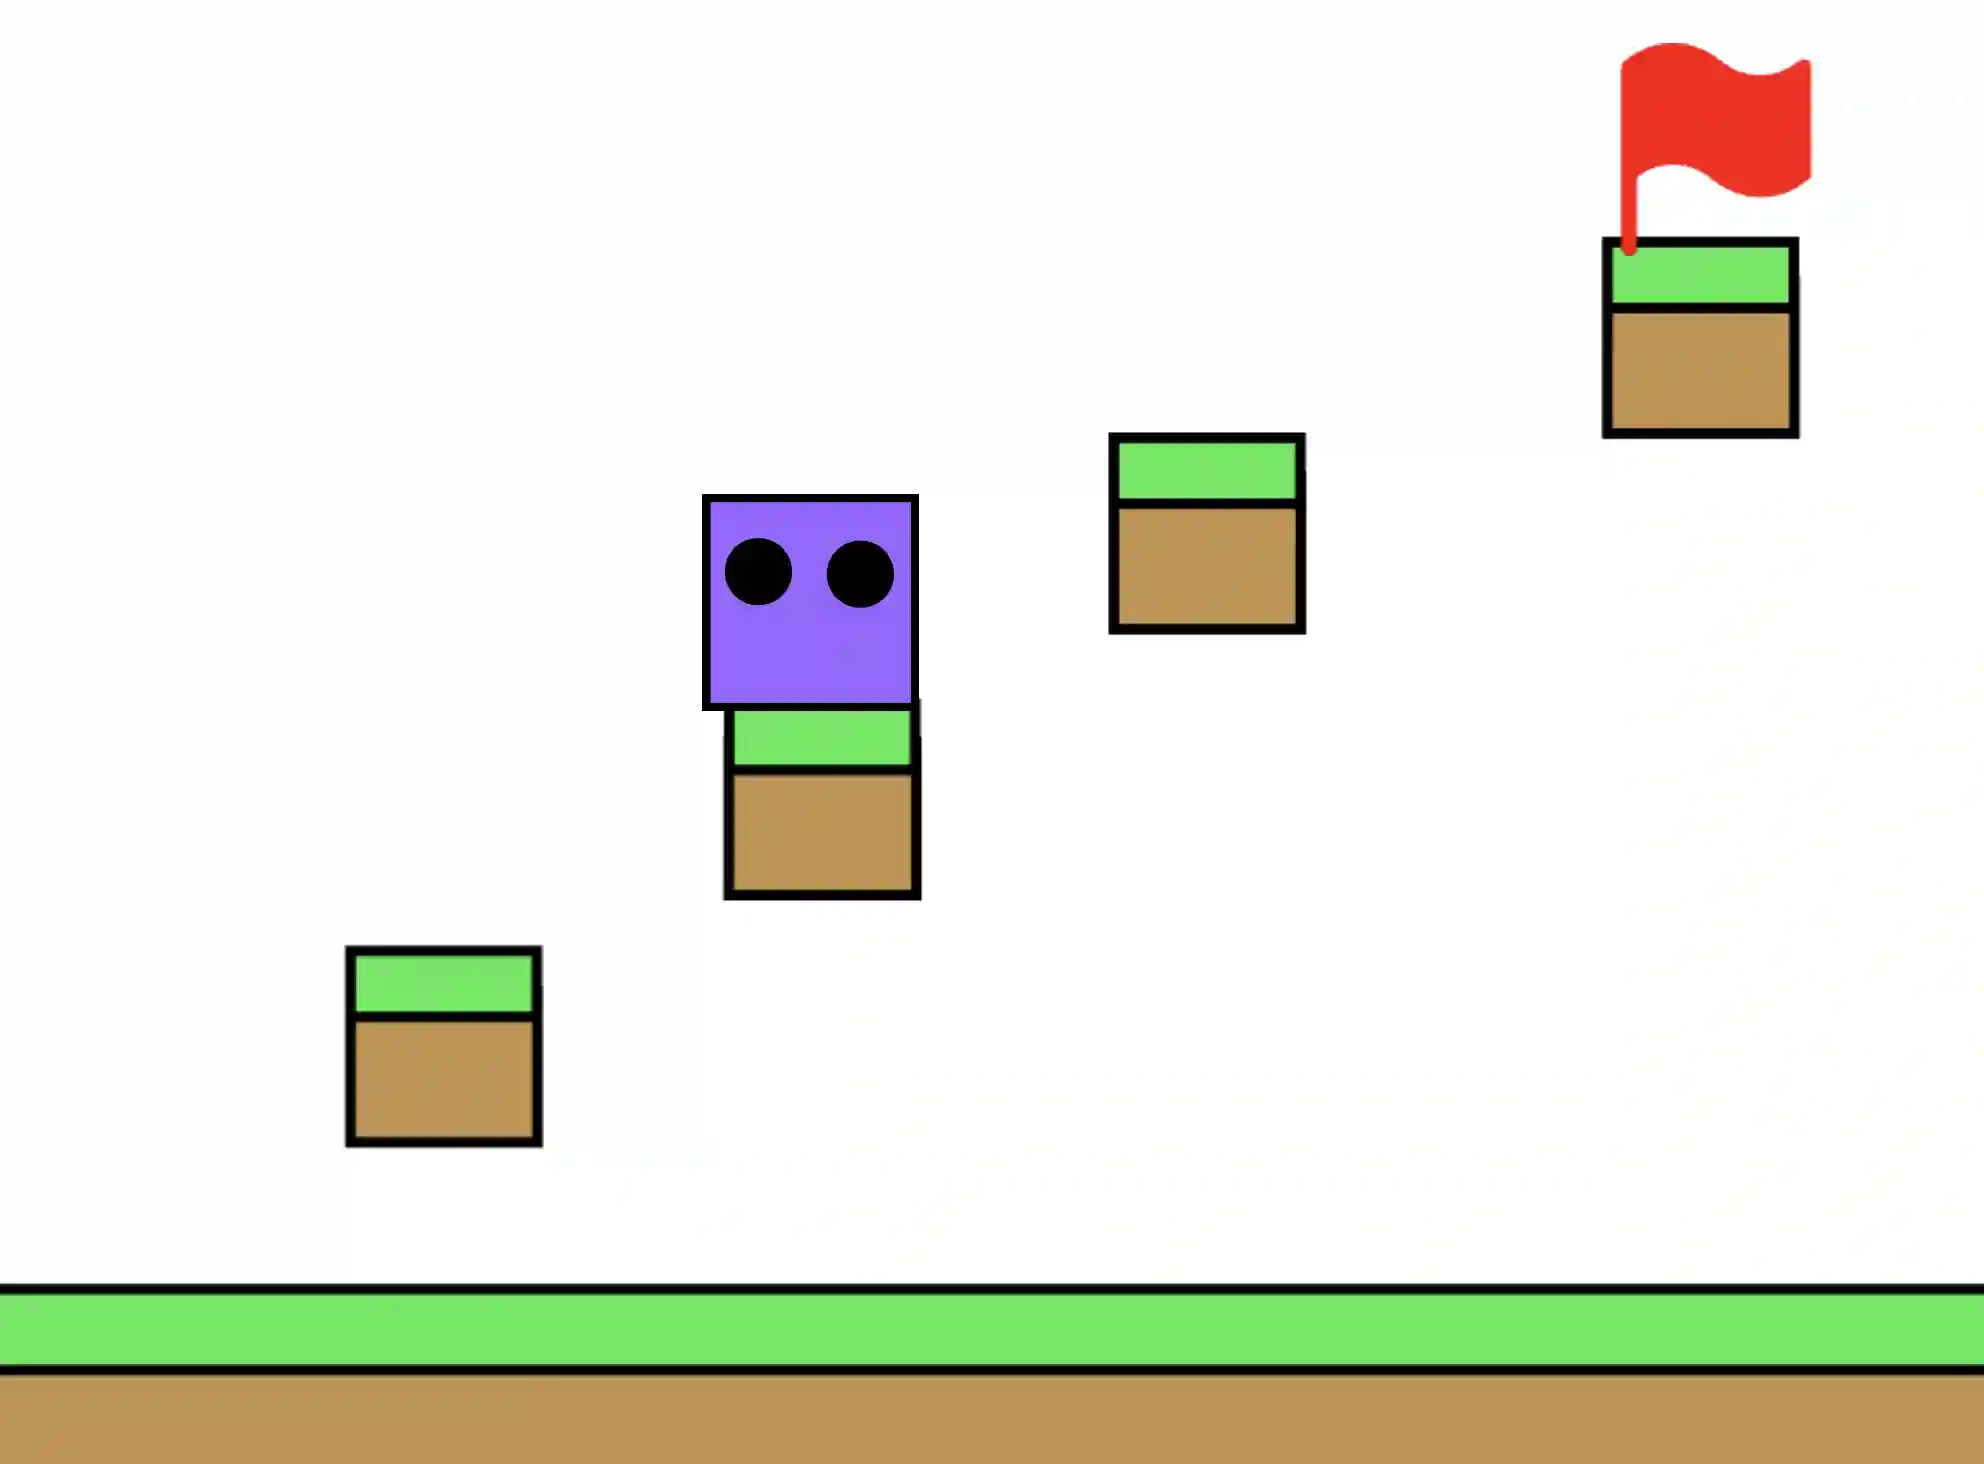
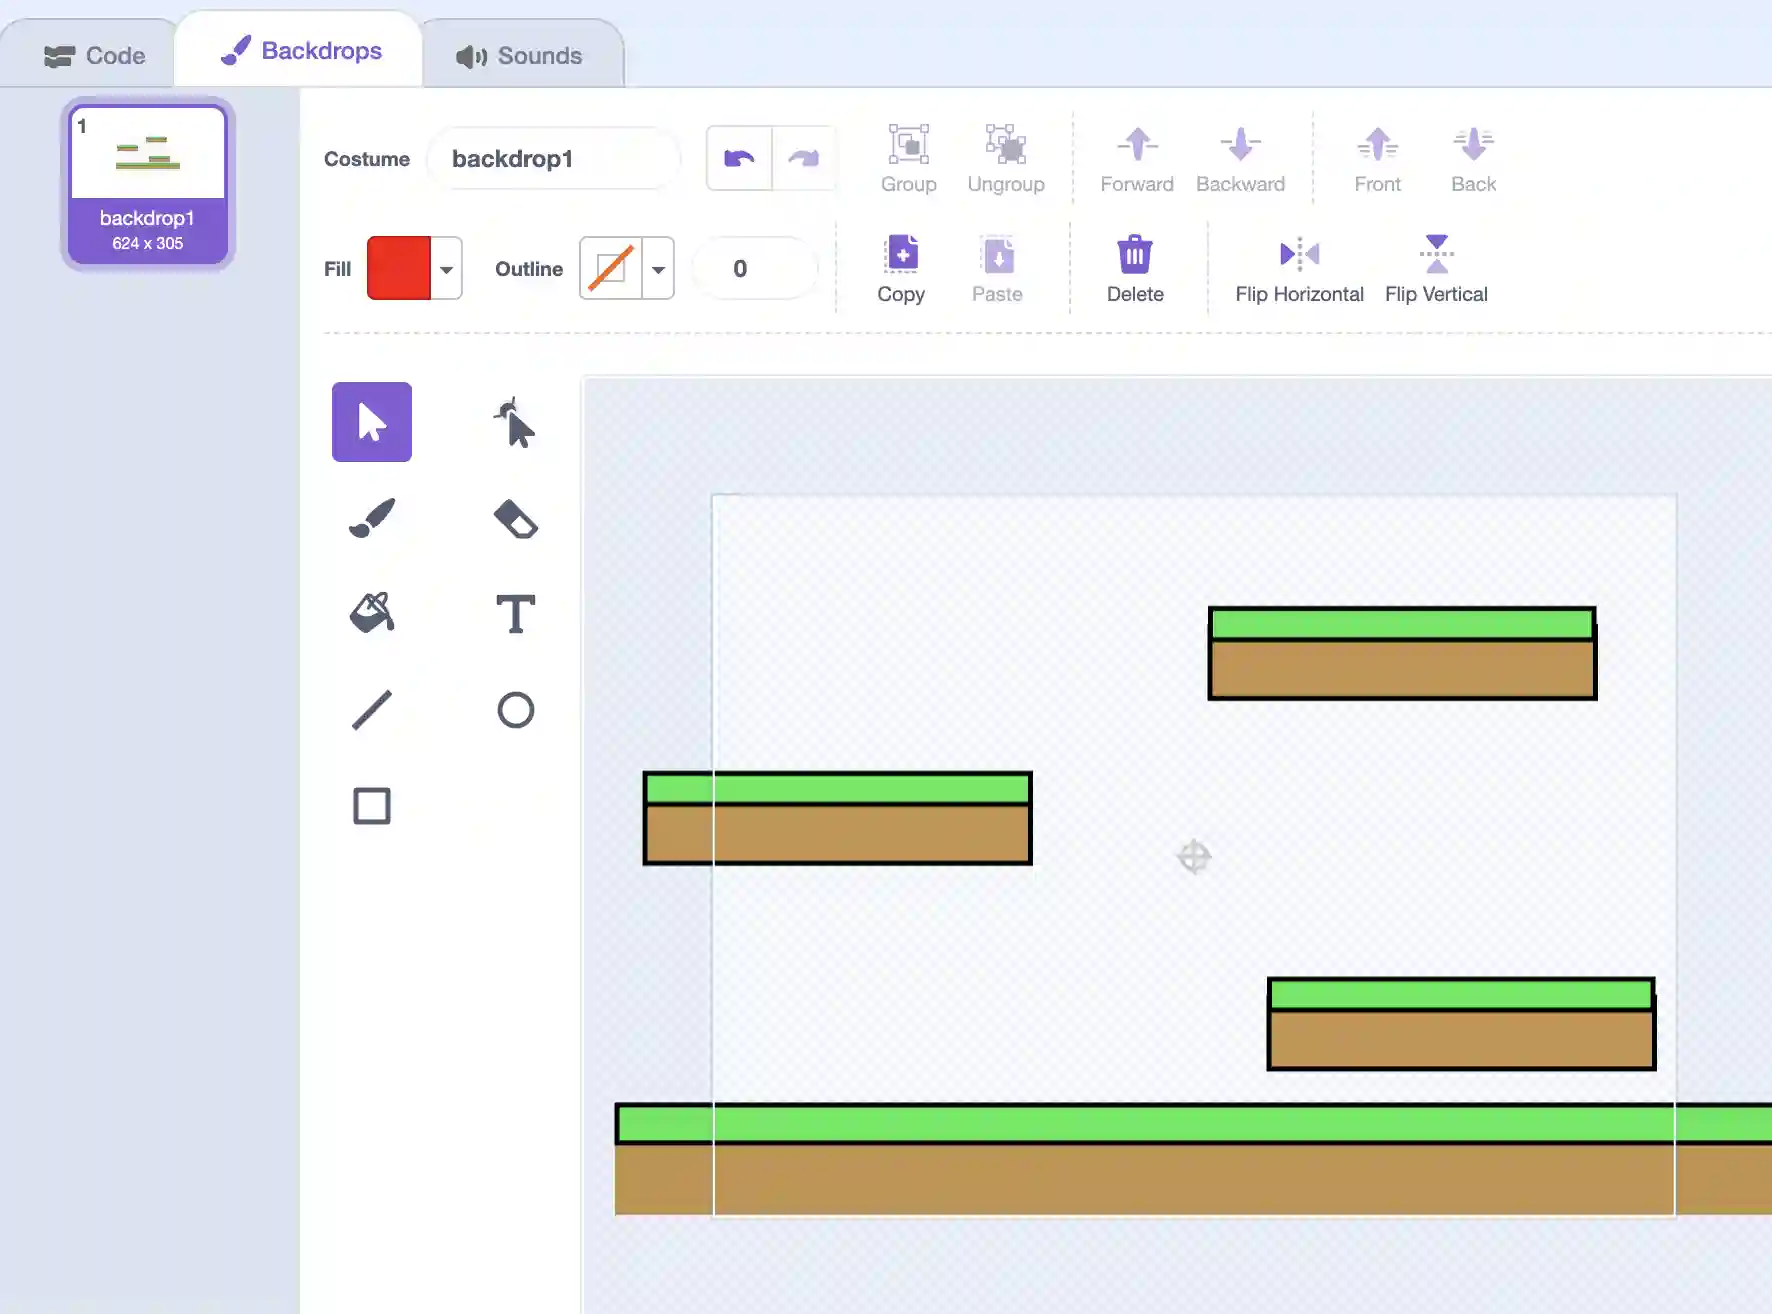
4. Create a background which you can draw to be the first level of this game, like so:
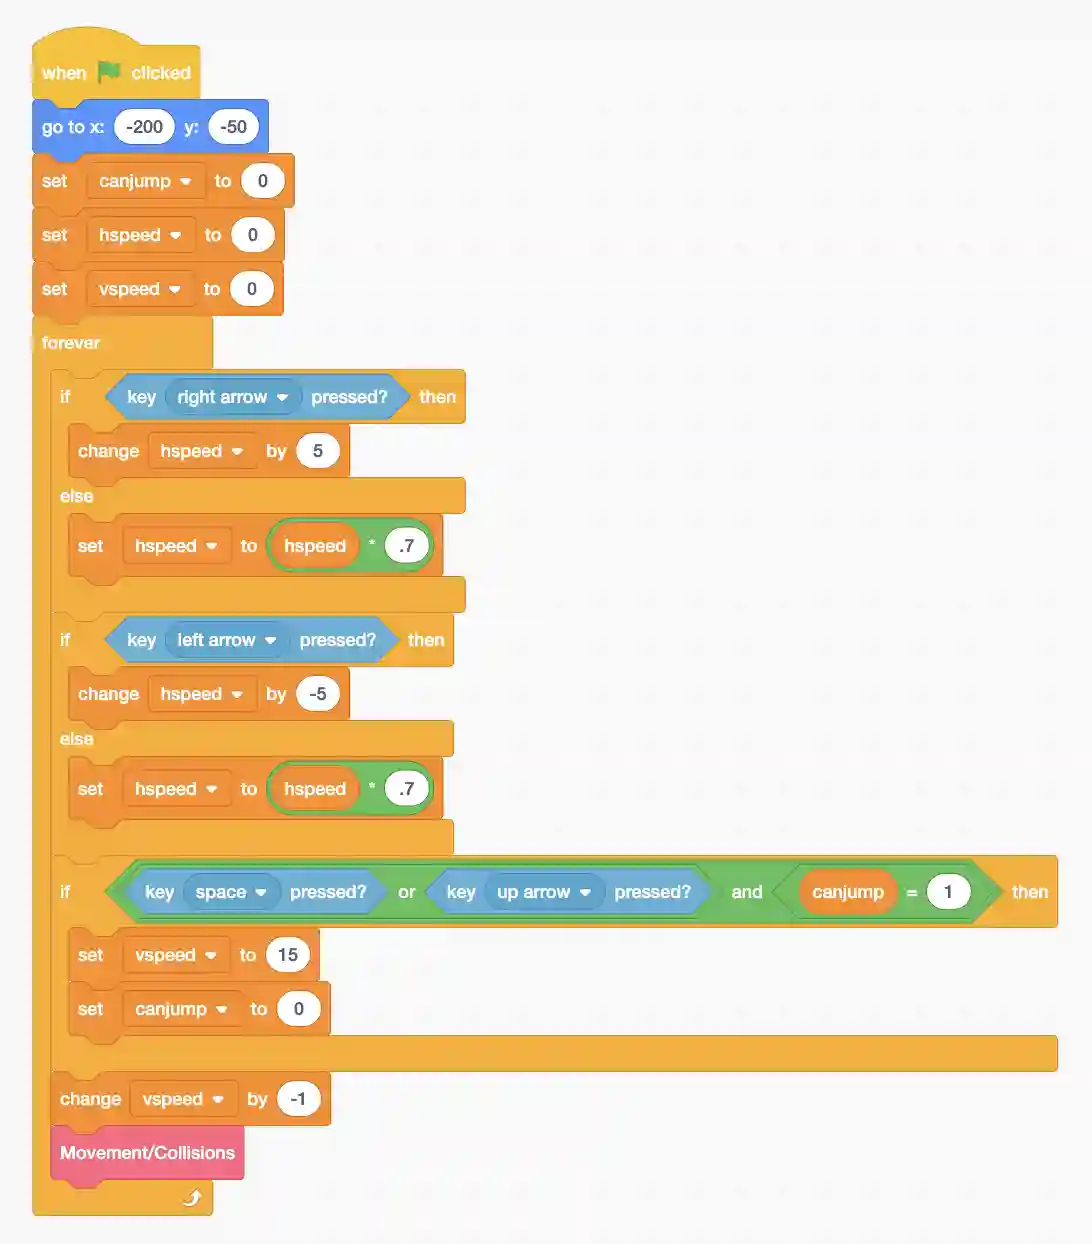
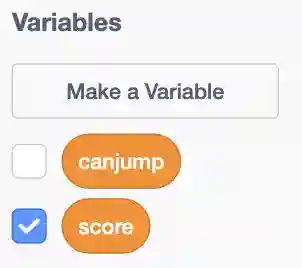
5. Go to the sprite that acts as your character, and create two new variables for it: hspeed and vspeed. These variables will control our sprite’s horizontal and vertical speed, respectivelly. Finally, create a new variable called canjump. This will control the player’s jumping.
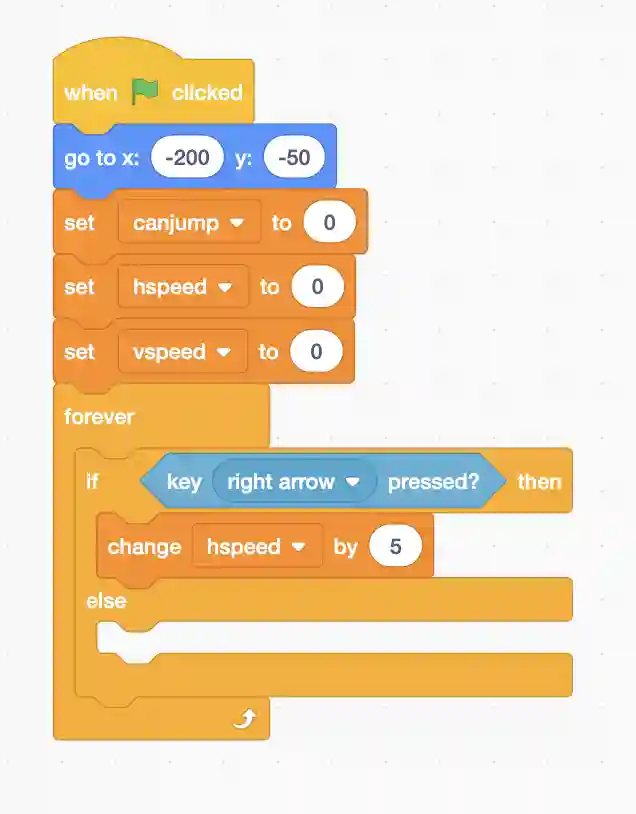
6. Drag out a “when flag clicked” block, and set all the variables to zero. Also, move the sprite to where you want them to start in the level.

7. Next, add a forever loop and add an “if, else conditional” with the condition being the right arrow key being pressed. Inside the “if” part, change the hspeed by 5. Note that we are not setting our horizontal speed to 5, but rather changing it by 5; this is so we can model acceleration the longer we are moving.
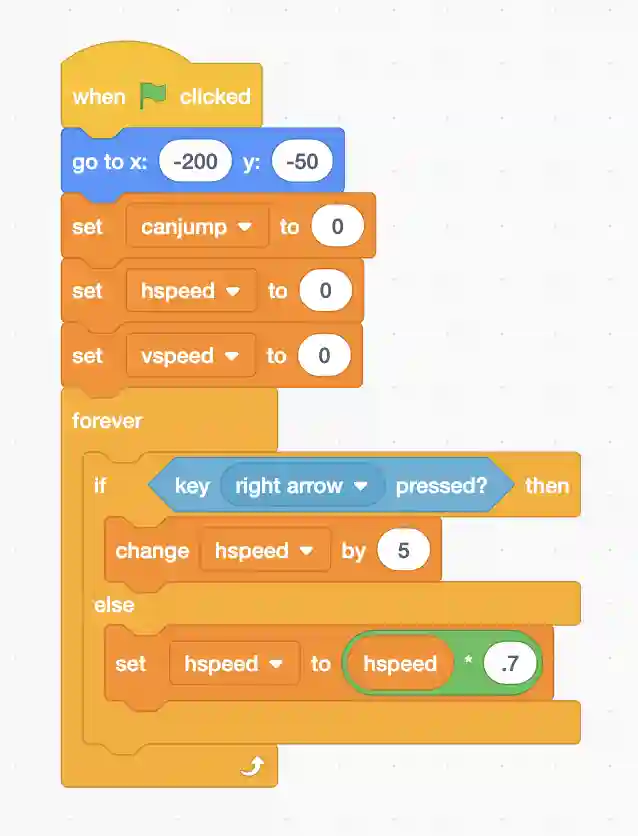
8. Inside the “else” section of the conditional, set hspeed to hspeed*0.7. This will model deceleration as we slow down when we are not moving instead of suddenly stopping.
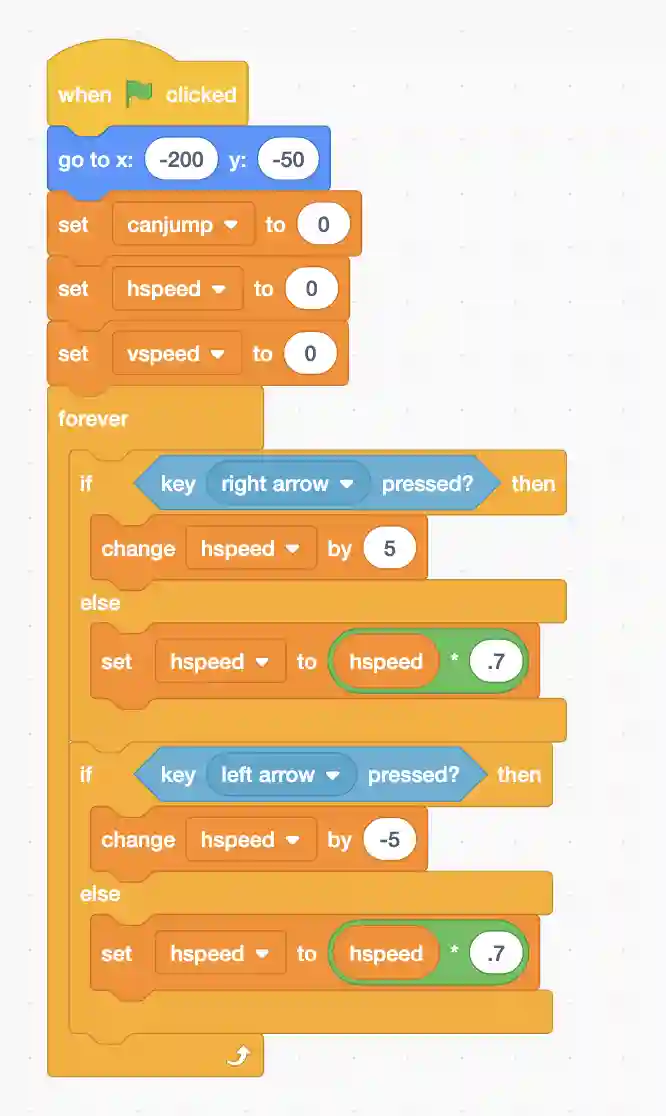
9. Duplicate the conditional and instead of having the duplicate trigger when the right arrow key is pressed, change it to the left arrow key. The only other change is to change hspeed by -5 instead of 5.
10. Now add an “if” conditional to check if the up arrow is pressed. If so, we will set the canjump variable to 0, as we can’t jump again till we touch the ground and we will change our vspeed to 15.
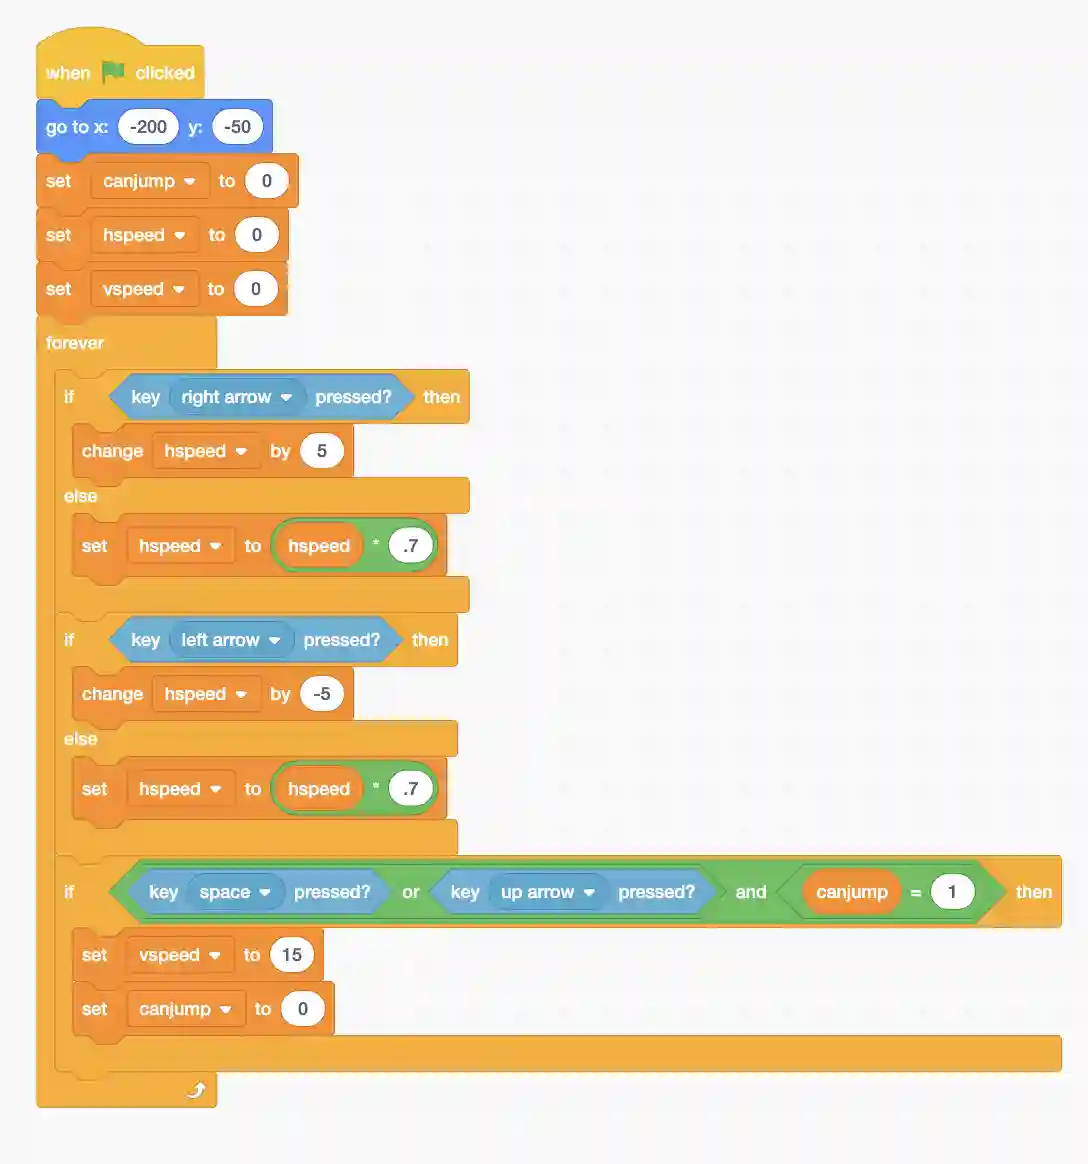
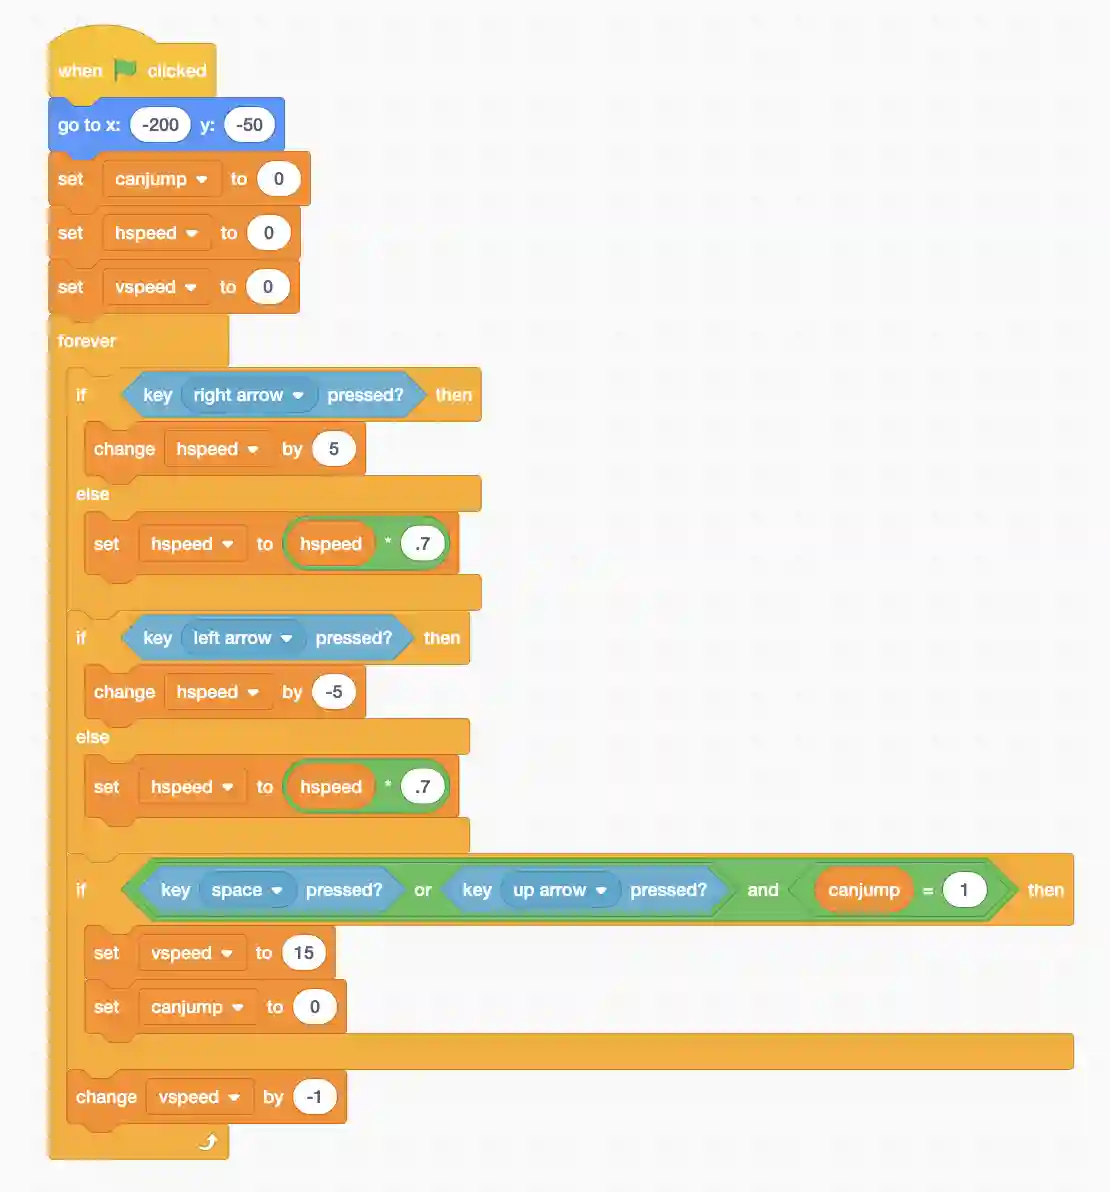
11. Now add a block that changes our vspeed by -1 every frame so we are constantly falling.
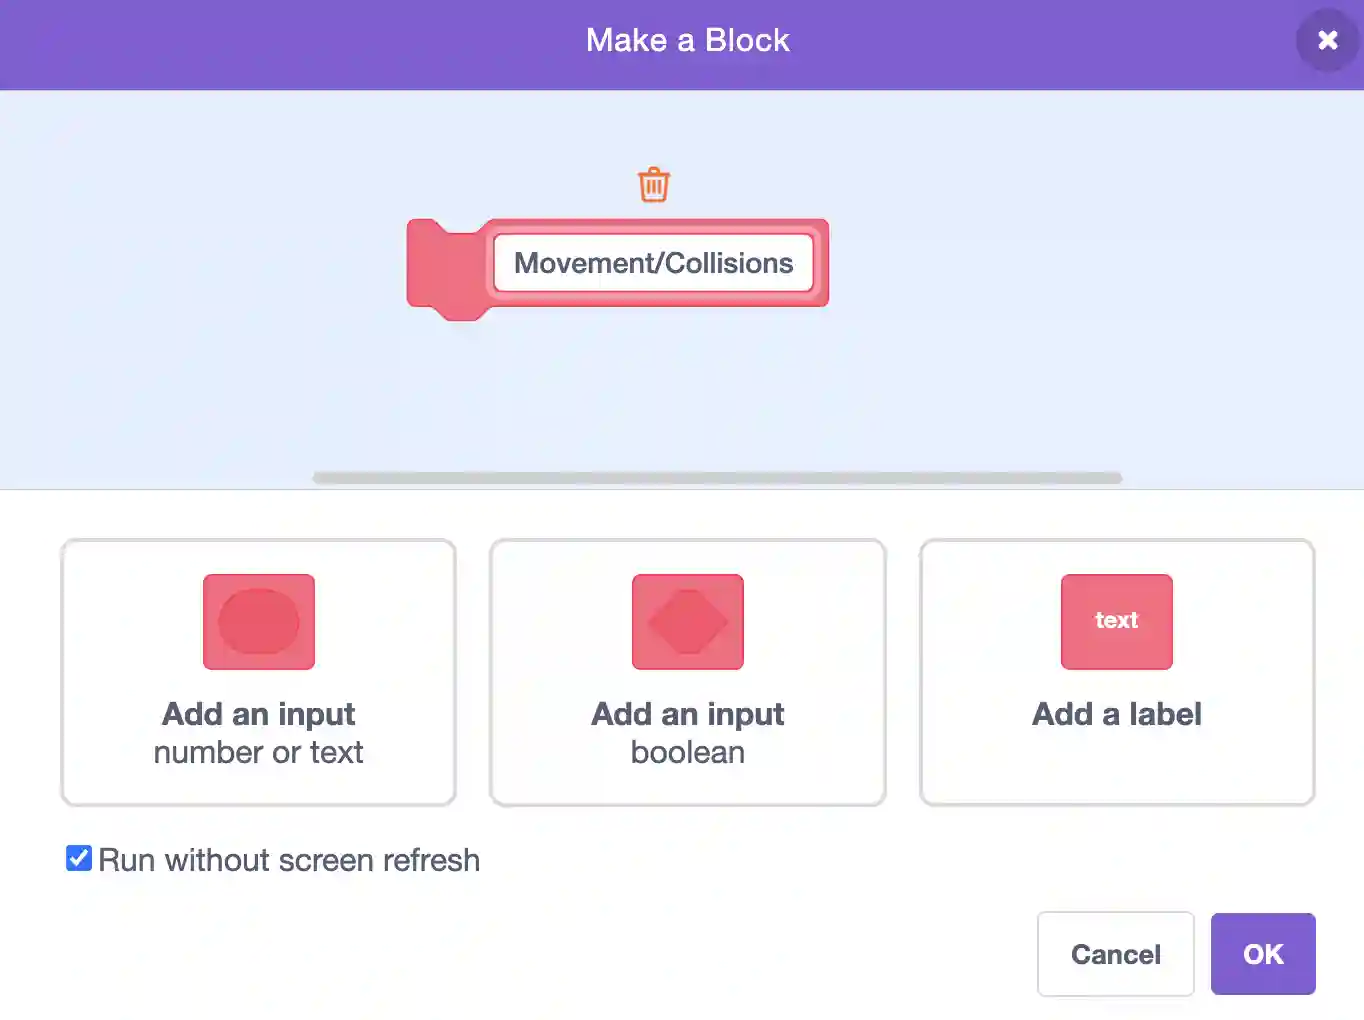
12. Now we have the outline of our code, but it’s all using variables! It is time to change that! Create a new custom block called Movement/Collisions. Make sure to tick the run without refresh option when creating it.
13. Place the following blocks under the definition of our new custom block.
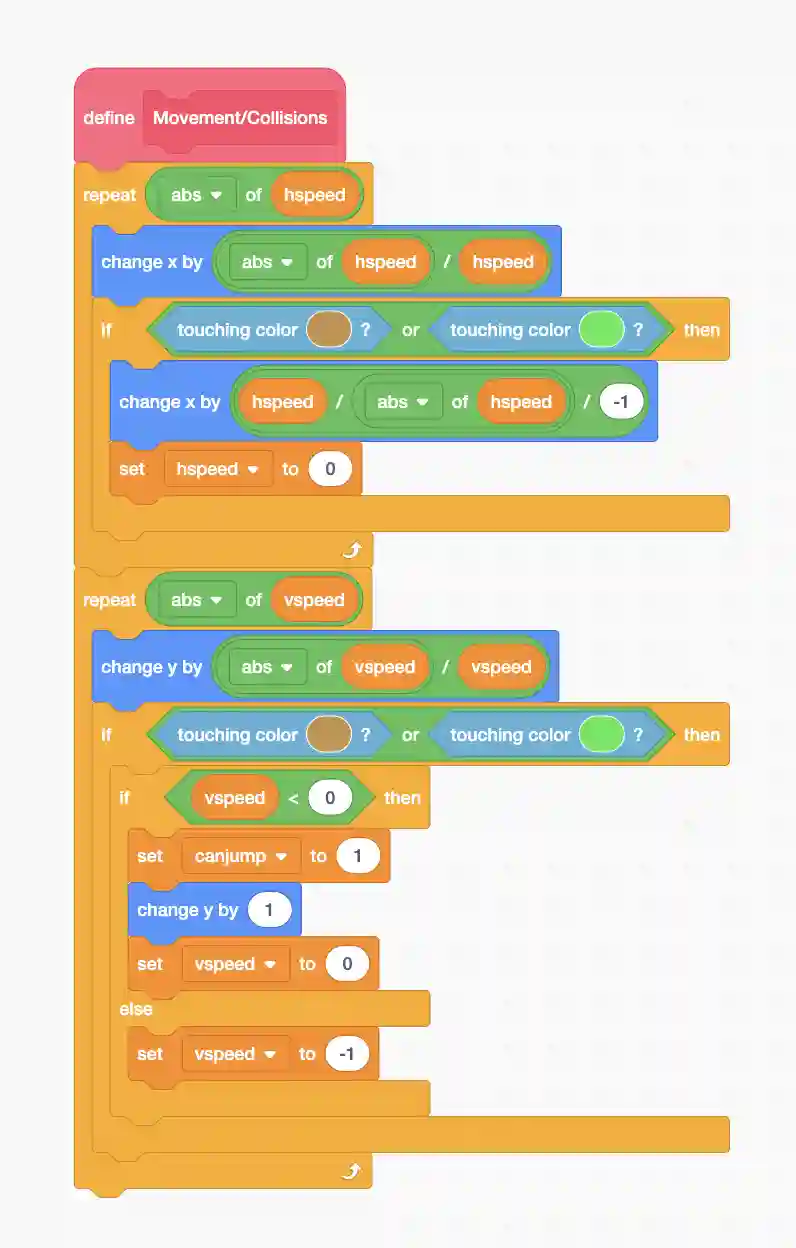
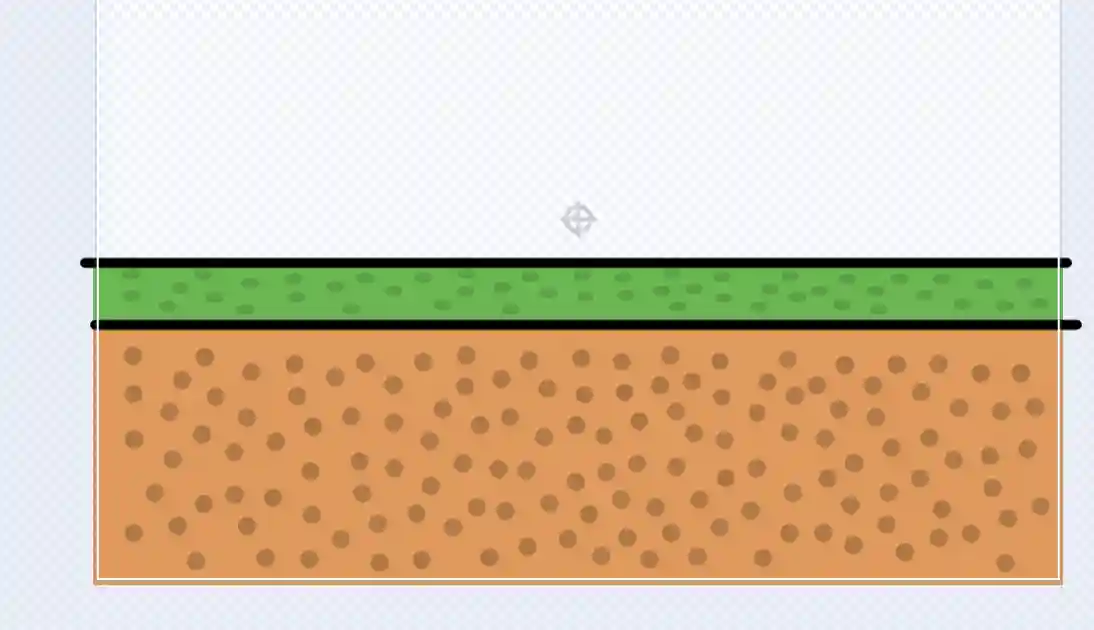
In the above logic, essentially, we have used our hspeed variable to implement real movement. If our hspeed is 10, the code will change our hspeed by 1, ten different times. If we ever touch the two colors our level is made out of (make sure the colors are the same as in your level), we simply back up to where we previously were and set uor speed to zero; this takes care of collisions. We do the same thing with vspeed, but we make a check to see if our vspeed is negative. If it is, it means we are falling and we can do essentially the same thing as we did for our hspeed. We also set canjump to 1 as we have reached the ground. If vspeed in positive, we have jumped and hit something above us, in which case we set the vspeed to -1 so we start falling.
14. Finally, drag our new custom block to our main “when flag clicked” program inside the forever loop.
Now we can add levels!
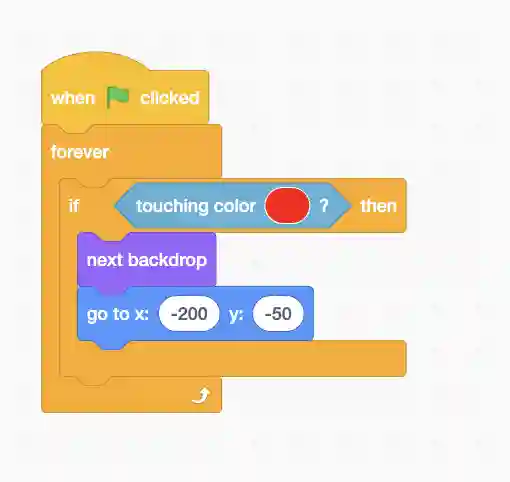
15. Add a red flag to your level; this will mark the finish point for the current level.
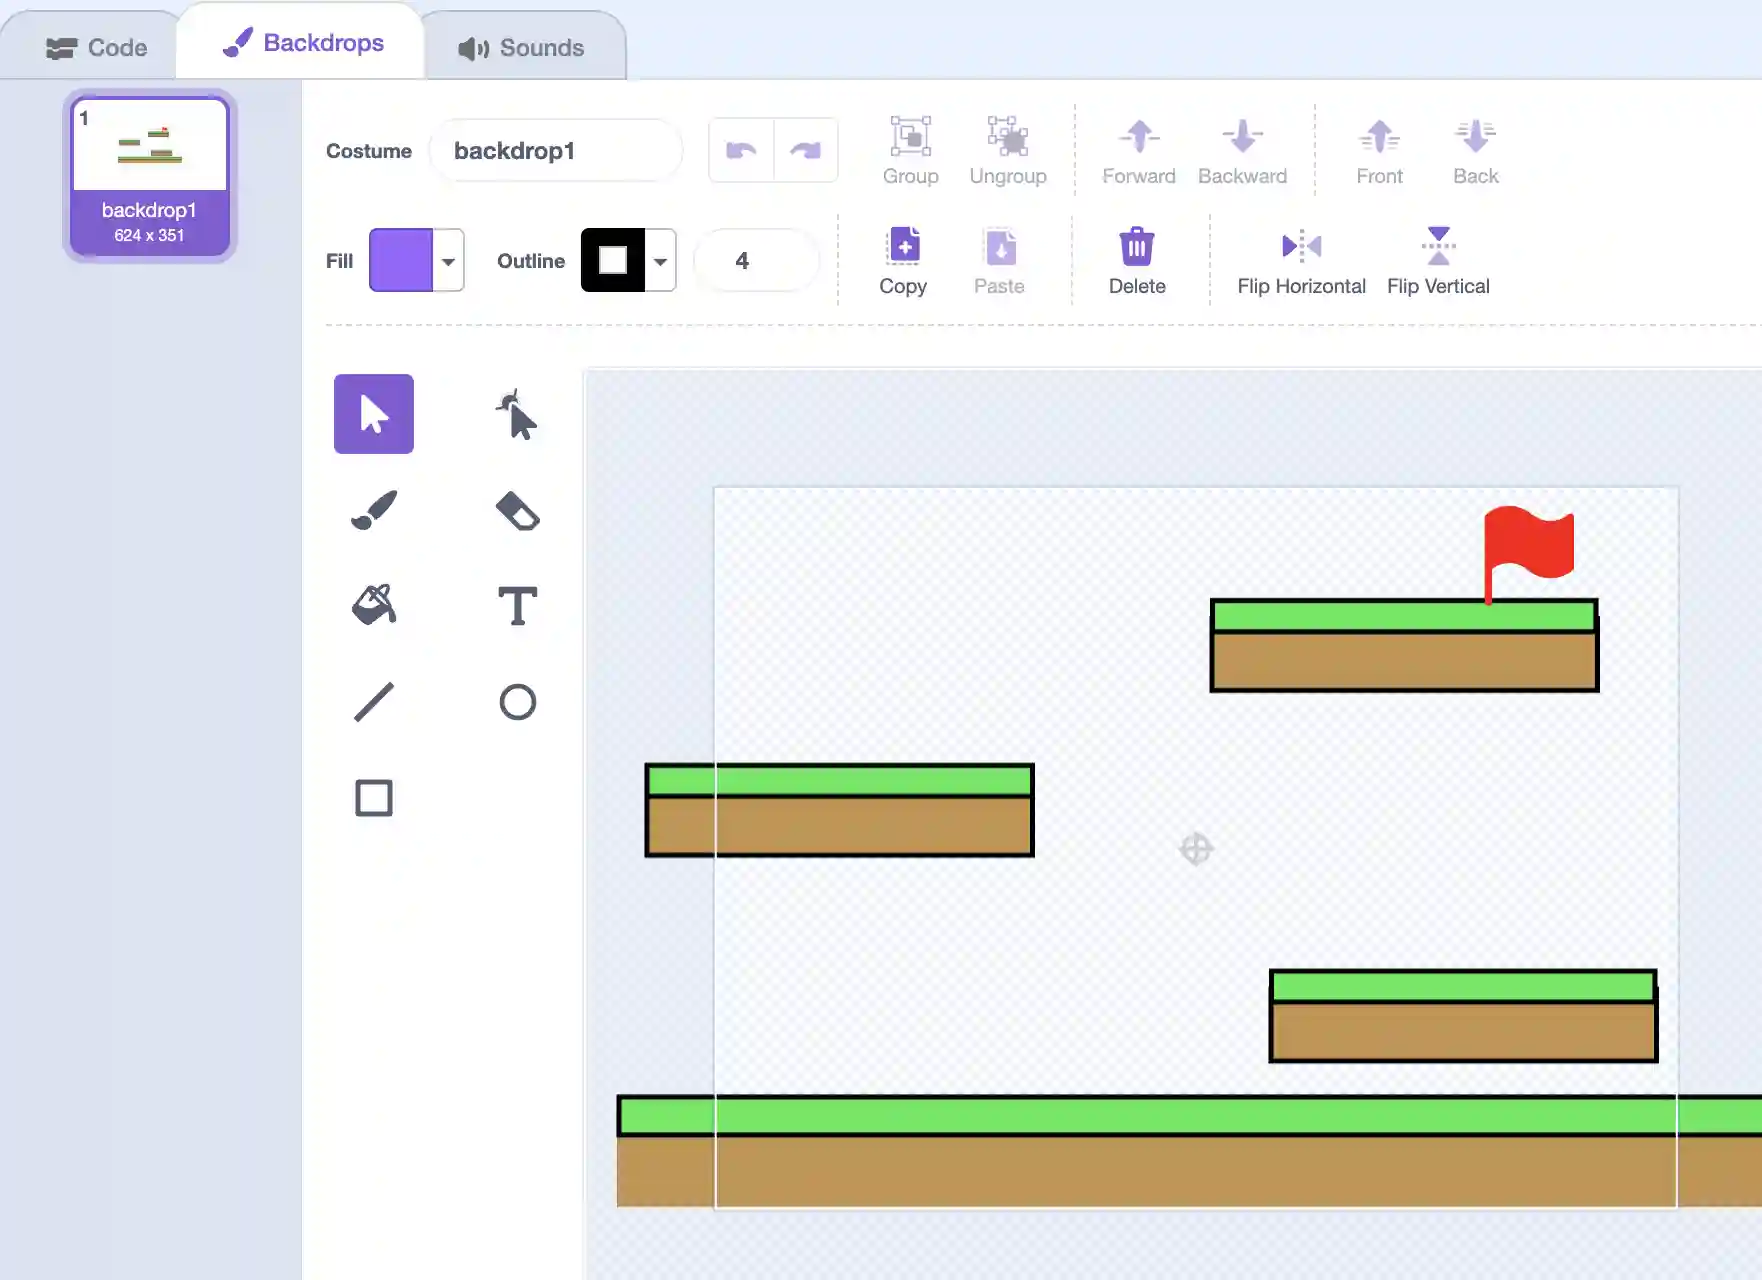
16. Go to the players code, and add a new “when flag clicked” event along with a forever loop. Inside add an “if” conditional and check if you are touching the color of the flag. If you are, we go to the next backdrop. Also make sure to make the player go to a specific position so they don’t start at the end of the next level. Make sure to add more backdrops so you have several different levels to play!
Coding a Scrolling Platformer
First we make the scrolling background.
1. Create the background as a sprite and paint it yourself. You can make your own background or import the attached graphics. Try to give your background a little bit of detail so the players can notice that it is scrolling.
2. The code below essentially puts the background at (0,0) and then starts scrolling it to the right. Once it reaches the right edge of the screen, it moves to the left and starts on its path again.
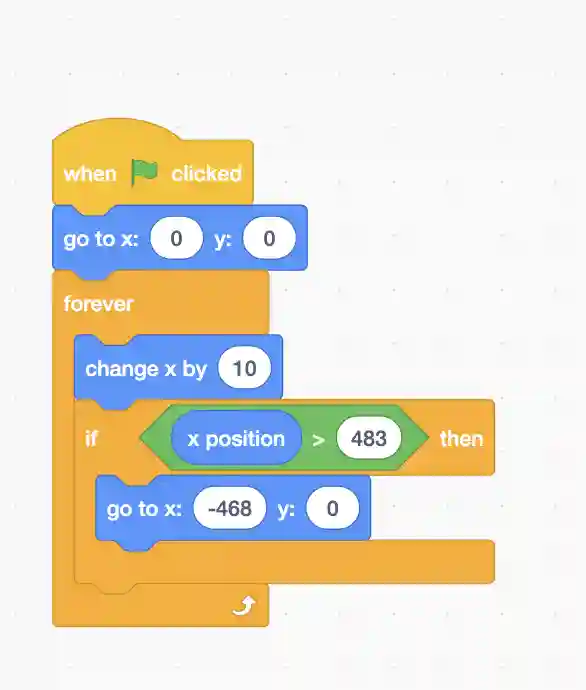
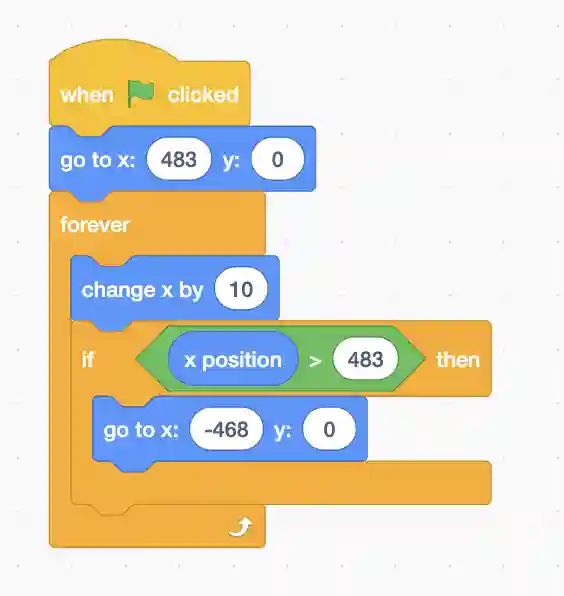
3. Duplicate this sprite and make a slight edit to the duplicate’s code. Instead of starting at (0,0) it will start at (483,0). These numbers are specifically picked so everything lines up. Feel free to play around with these numbers to get the perfect scrolling effect for your game.
Now let us code our player:
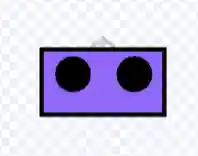
1. Now create a different sprite, call it “player”. Once again you can paint the sprite, which will act as our main character. Inside the paint menu, add a second costume which will be the sprite ducking.
2. Inside the player sprite create a variable for all sprites; “score”. This will control our score as we progress through the level. Make sure to tick the box next to score in the variables section so players can see it in the game.
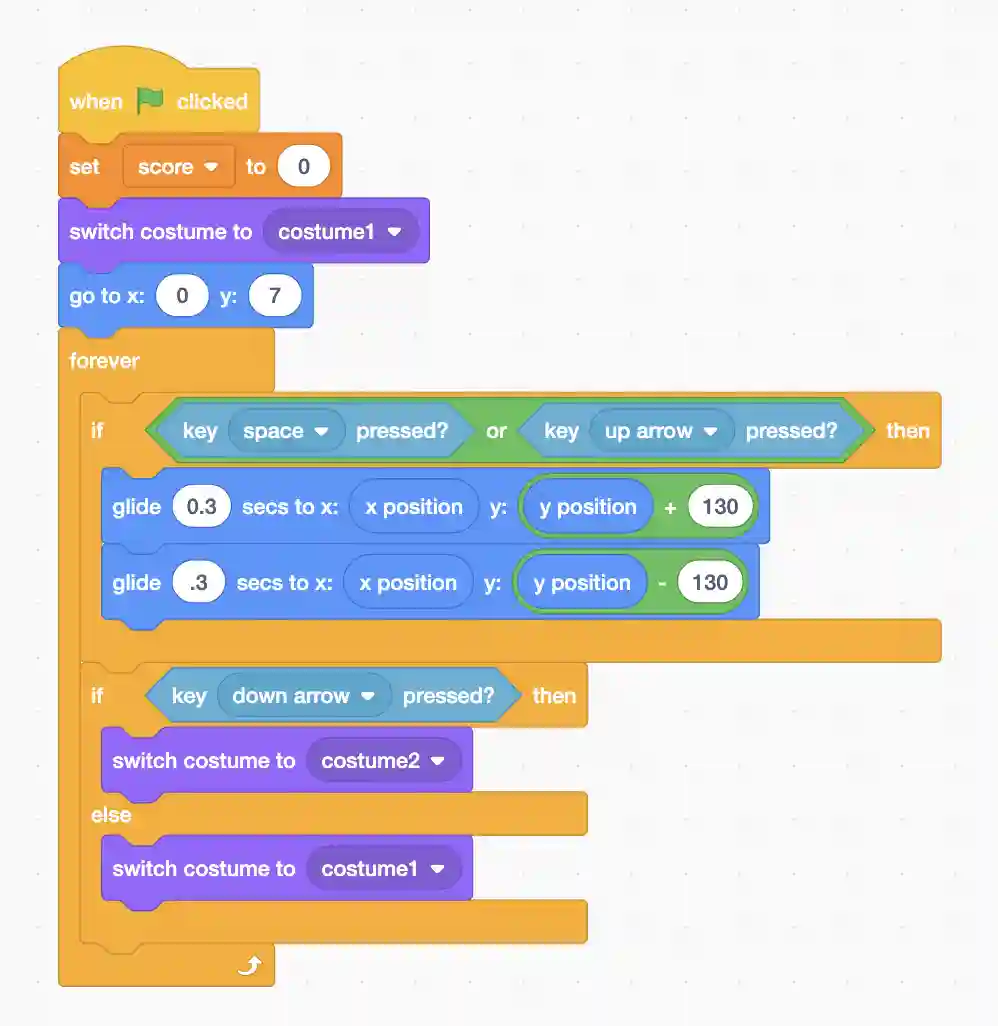
3. The below code sets our score variable to zero and makes sure to switch our costume to the original one. Then we tell our sprite where to go. If we press the up arrow or space key, we go up 130 units, and back down; modeling a jump. Then we check if the down arrow key is being pressed. If yes, we switch the costume to the ducking costume. If not we switch the costume to the original costume.
Coding the arrows
1. Create a new sprite and call it “arrows”. These will be the obstacles you need to dodge to get points. You can paint your own arrow.
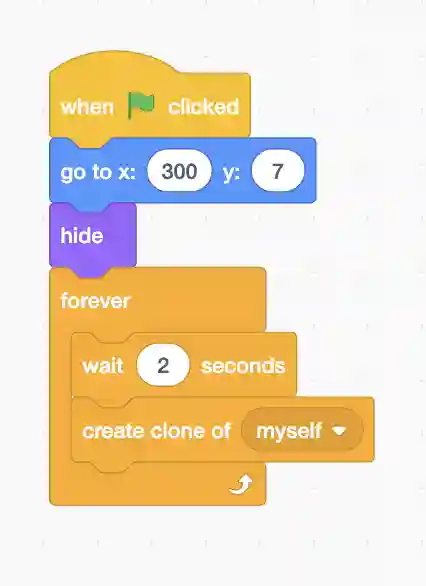
2. The bit of code below just tells the arrow to go to the edge of the screen, hide so it becomes invisible and to make a clone of itself every two seconds.
3. The below code takes care of the clones. It tells them to go to a random y-location and to then show themselves. Then they travel left towards the player. If they pass the player to the other edge of the screen, they change score by one and then are deleted.

Coding the end of the Game
The game ends when the player hits an arrow. To implement this feature, go to the player sprite:
1. Add a third costume that simply is a big piece of text saying “GAME OVER!”.

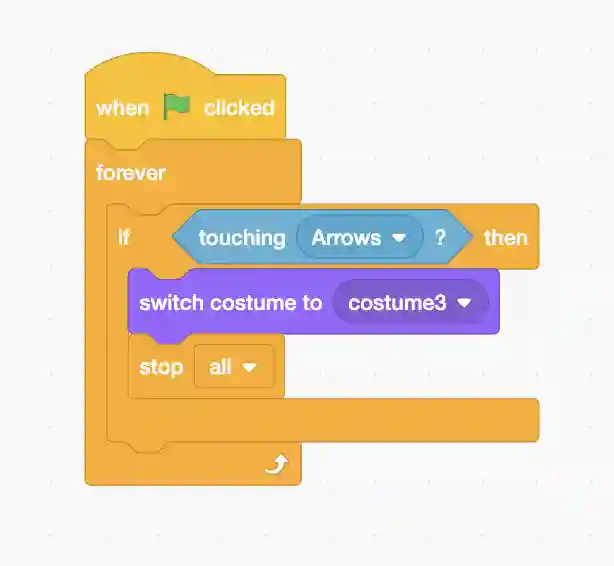
2. The below code is added to the player sprite and essentially checks if we ever touch the arrow (or its clones). If so, we switch the costume to the game over text and stop all the code that might keep the game running.
That’s it! What about the scrolling level based platformer? Well, that is the topic for another blogpost but you get the basic idea. We need to combine the level based elements of our first platformer with the scrolling element of the second.
In summary, creating platformer games on Scratch opens a gateway to a world of imagination, creativity, and fun. Whether you're a beginner exploring game development or an experienced programmer looking for a new medium to express your ideas, Scratch offers a remarkable platform to nurture your skills. With its intuitive interface and supportive community, you can embark on a rewarding journey of creating your very own unique style of games. Have fun with your creations!
If you enjoyed building the platformer, check out some fun Scratch Resources.
Ready to build your next game? Learn how to make a clicker game in Scratch.
Take Your Scratch skills to the next level
Ready to create amazing games, animations, and stories? Kodeclik’s Scratch courses teach you how to code while bringing your ideas to life. Whether you're just starting out or looking to master advanced projects, there's something exciting waiting for you.
Want to learn Scratch with us? Sign up for our Scratch Programming online class.
